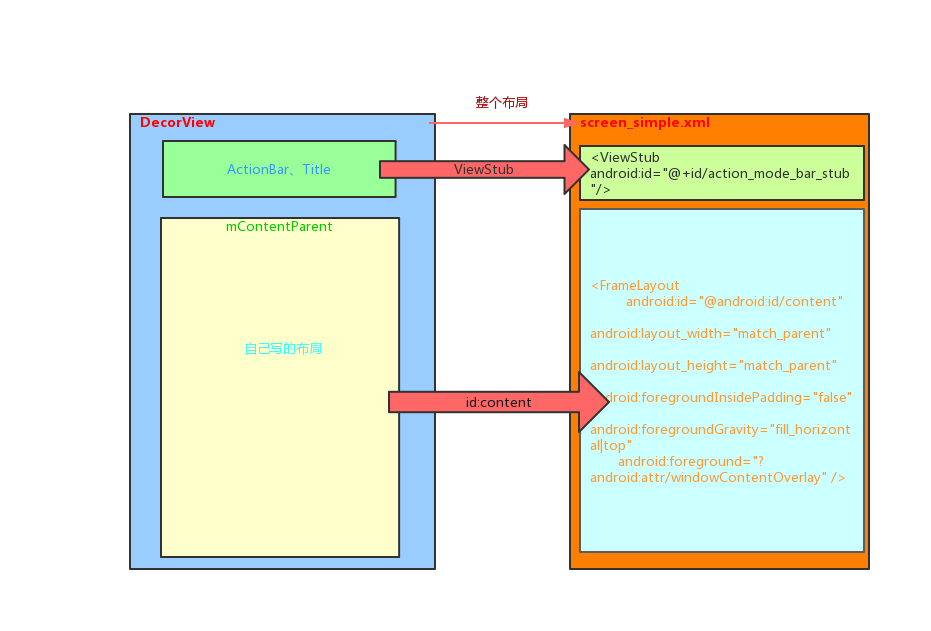
浅谈Window视图绑定与工作原理

在一个APP中,其实UI的处理也就是视图的工作并不是交由Activity来处理的,Activity并不负责视图控制,它只是控制生命周期和处理事件。真正控制视图的是Window。一个Activity包含着一个Window,Window才是真正代表一个窗口。Activity就像一个控制器,统筹视图的添加与显示,以及通过其他回调方法,来与Window、以及View进行交互。举个什么例子呢,这似乎就像CPU和显卡之间的关系,CPU的工作就好像是这里的Activity,而显卡就好像是Window,主要负责的是视图相关的工作绘制UI、加载图像之类的。那么什么是Window呢:

  • Window是一个抽象的概念,它是所有View的直接管理者,任何视图都需要通过Window来呈现在界面上,当然除了单纯的界面视图的处理以外,视图的逻辑部分Window也会涉及处理,就像View的事件分发一样,中间还是需要经过一层的Window的处理

Window的创建

上次简单分析完了App启动流程,在流程最后的activity的创建部分,调用了activity.attach方法,我们只是简单的提了一下是关于Window的创建与绑定,现在我们就以这个方法为入口来看看Window与APP视图的工作原理

WindowManagerGlobal.initialize();

final Activity a = performLaunchActivity(r, customIntent);

initialize函数主要是在WindowManagerGlobal中获取WindowManagerService的代理,然后performLaunchActivity会通过反射创建并返回一个Activity对象,先看initialize方法吧:

public static void initialize() {
getWindowManagerService();
}
public static IWindowManager getWindowManagerService() {
synchronized (WindowManagerGlobal.class) {
if (sWindowManagerService == null) {
//通过向ServiceManager查询一个字符串为window的key返回一个IBinder对象
//然后asInterface方法又会返回一个本地代理
sWindowManagerService = IWindowManager.Stub.asInterface(
ServiceManager.getService("window"));
try {
if (sWindowManagerService != null) {
//设置动画
ValueAnimator.setDurationScale(
sWindowManagerService.getCurrentAnimatorScale());
}
} catch (RemoteException e) {
throw e.rethrowFromSystemServer();
}
}
return sWindowManagerService;
}
}

这里是一个doubleCheck方式的单例,返回了一个WinowManagerService的代理,通过IWindowManager.Stub.asInterface方法获取到的,这很显然是AIDL的方式,这与App进程与系统进程通信时,获取ActivityManagerService代理是不是简直一模一样呢。然后再看performLaunchActivity方法:

//这里省略大部分代码
// 调用activity的attach方法
activity.attach(appContext, this, getInstrumentation(), r.token,
r.ident, app, r.intent, r.activityInfo, title, r.parent,
r.embeddedID, r.lastNonConfigurationInstances, config,
r.referrer, r.voiceInteractor, window, r.configCallback);
··· ···

也就是说在Activity的创建过程中,也会把视图相关的对象绑定到当前Activity上,现在来看看具体是如何工作的:

final void attach(Context context, ActivityThread aThread,
Instrumentation instr, IBinder token, int ident,
Application application, Intent intent, ActivityInfo info,
CharSequence title, Activity parent, String id,
NonConfigurationInstances lastNonConfigurationInstances,
Configuration config, String referrer, IVoiceInteractor voiceInteractor,
Window window, ActivityConfigCallback activityConfigCallback) {
//注释1
attachBaseContext(context);

mFragments.attachHost(null /*parent*/);

//注释2
mWindow = new PhoneWindow(this, window, activityConfigCallback);
mWindow.setWindowControllerCallback(this);
mWindow.setCallback(this);
mWindow.setOnWindowDismissedCallback(this);
mWindow.getLayoutInflater().setPrivateFactory(this);
...

mWindow.setWindowManager(
(WindowManager)context.getSystemService(Context.WINDOW_SERVICE),
mToken, mComponent.flattenToString(),
(info.flags & ActivityInfo.FLAG_HARDWARE_ACCELERATED) != 0);
if (mParent != null) {
mWindow.setContainer(mParent.getWindow());
}
mWindowManager = mWindow.getWindowManager();
....
}

这里还是只留下了与今天主题相关部分的代码,首先注释1处会为activity绑定上下文,注释2处创建了一个Window对象,之所以是一个PhoneWindow对象,是因为Window是一个抽象类,具体的实现类就是PhoneWindow,然后为Window对象设置各类监听器和一个WindowManager,activity实现了Window的Callback接口,所以当Window视图发生变化时会回调Activity的方法。到这里Window的创建就完成了,那么Window是怎么接管Activity的视图的,Window又是如何附属在Activity上的,下面开始分析。

Window与Activity间的依附

Activity的视图部分添加一般都会在onCreate方法里调用setContentView方法,那么我们只需要看setContentView方法即可:

public void setContentView(@LayoutRes int layoutResID) {
getWindow().setContentView(layoutResID);
initWindowDecorActionBar();
}
public Window getWindow() {
return mWindow;
}

从Activity的setContentView的实现可以看出,它将具体实现交给了Window,而这个mWindow就是之前的new PhoneWindow,所以这里真正实现的是PhoneWindow的setContentView方法:

@Override
public void setContentView(int layoutResID) {
// Note: FEATURE_CONTENT_TRANSITIONS may be set in the process of installing the window
// decor, when theme attributes and the like are crystalized. Do not check the feature
// before this happens.
if (mContentParent == null) {
installDecor();
} else if (!hasFeature(FEATURE_CONTENT_TRANSITIONS)) {
mContentParent.removeAllViews();
}

if (hasFeature(FEATURE_CONTENT_TRANSITIONS)) {
final Scene newScene = Scene.getSceneForLayout(mContentParent, layoutResID,
getContext());
transitionTo(newScene);
} else {
// 将View添加到DecorView的mContentParent中
// 调用LayoutInflater的inflate方法解析布局文件,并生成View树,mContentParent为View树的根节点
mLayoutInflater.inflate(layoutResID, mContentParent);
}
mContentParent.requestApplyInsets();

//回调Activity的onContentChanged方法通知视图发生改变
final Callback cb = getCallback();
if (cb != null && !isDestroyed()) {
cb.onContentChanged();
}
mContentParentExplicitlySet = true;
}

首先是调用installDecor方法在PhoneWindow内部创建一个DecorView:

创建并初始化DecorView

private void installDecor() {
mForceDecorInstall = false;
//通过generateDecor方法创建DecorView
if (mDecor == null) {
mDecor = generateDecor(-1);
mDecor.setDescendantFocusability(ViewGroup.FOCUS_AFTER_DESCENDANTS);
mDecor.setIsRootNamespace(true);
if (!mInvalidatePanelMenuPosted && mInvalidatePanelMenuFeatures != 0) {
mDecor.postOnAnimation(mInvalidatePanelMenuRunnable);
}
} else {
mDecor.setWindow(this);
}
//通过generateLayout加载布局文件到DecorView,具体的布局与设置的主题和系统版本有关
//最终返回一个ViewGroup对象并赋值给mContentParent
if (mContentParent == null) {
mContentParent = generateLayout(mDecor);

// Set up decor part of UI to ignore fitsSystemWindows if appropriate.
mDecor.makeOptionalFitsSystemWindows();

final DecorContentParent decorContentParent = (DecorContentParent) mDecor.findViewById(
R.id.decor_content_parent);

if (decorContentParent != null) {
mDecorContentParent = decorContentParent;
mDecorContentParent.setWindowCallback(getCallback());
if (mDecorContentParent.getTitle() == null) {
mDecorContentParent.setWindowTitle(mTitle);
}

···
} else {
mTitleView = findViewById(R.id.title);
if (mTitleView != null) {
if ((getLocalFeatures() & (1 << FEATURE_NO_TITLE)) != 0) {
final View titleContainer = findViewById(R.id.title_container);
if (titleContainer != null) {
titleContainer.setVisibility(View.GONE);
} else {
mTitleView.setVisibility(View.GONE);
}
mContentParent.setForeground(null);
} else {
mTitleView.setText(mTitle);
}
}
}

if (mDecor.getBackground() == null && mBackgroundFallbackResource != 0) {
mDecor.setBackgroundFallback(mBackgroundFallbackResource);
}
···
}
}
}

首先会通过generateDecor方法直接创建一个DecorView对象,然后在调用generateLayout赋值给mContentParent:

protected DecorView generateDecor(int featureId) {
// System process doesn't have application context and in that case we need to directly use
// the context we have. Otherwise we want the application context, so we don't cling to the
// activity.
Context context;
if (mUseDecorContext) {
Context applicationContext = getContext().getApplicationContext();
if (applicationContext == null) {
context = getContext();
} else {
context = new DecorContext(applicationContext, getContext());
if (mTheme != -1) {
context.setTheme(mTheme);
}
}
} else {
context = getContext();
}
return new DecorView(context, featureId, this, getAttributes());
}

protected ViewGroup generateLayout(DecorView decor) {
....

mDecor.startChanging();
mDecor.onResourcesLoaded(mLayoutInflater, layoutResource);

ViewGroup contentParent = (ViewGroup)findViewById(ID_ANDROID_CONTENT);

....

mDecor.finishChanging();

return contentParent;
}

这里findViewById(ID_ANDROID_CONTENT)通过这个Id找到是哪个View呢,其实就是mContentParent,这个ViewGroup是整个contentView中所有view的根节点。这里我么能通过查看系统布局文件,可以发现这个View是一个FrameLayout:

screen_simple.xml:

<LinearLayout xmlns:android="http://schemas.android.com/apk/res/android"
android:layout_width="match_parent"
android:layout_height="match_parent"
android:fitsSystemWindows="true"
android:orientation="vertical">
<ViewStub android:id="@+id/action_mode_bar_stub"
android:inflatedId="@+id/action_mode_bar"
android:layout="@layout/action_mode_bar"
android:layout_width="match_parent"
android:layout_height="wrap_content"
android:theme="?attr/actionBarTheme" />
<FrameLayout
android:id="@android:id/content"
android:layout_width="match_parent"
android:layout_height="match_parent"
android:foregroundInsidePadding="false"
android:foregroundGravity="fill_horizontal|top"
android:foreground="?android:attr/windowContentOverlay" />
</LinearLayout>

其实除了这个文件以外的其他系统布局文件都会有这个id为content的FrameLayout,我们在Activity中设置的布局文件就会依附在这个FrameLayout上面,而整个布局属于decoerView,通常是一个LinearLayout。

PhoneWindow的setContentView大概流程就是:首先创建DecorView和mContentParent,并将mContentParent添加到DecorView中,然后将解析出来的View以mContentParen为根节点添加到mContentParent中即添加到了DecorView中,最后回调Activity中的方法通知视图发生改变。

这里我画了一张图来描述整个关系:

DecorView内部结构

添加Window以显示视图

当View添加到了创建的DecorView上之后,这些View还没有真正显示到屏幕上,接下来就分析这个显示流程。那么在Activity的启动过程中,在哪一个环节实现的View的显示的呢,其实是在handleResumeActivity方法里:

public void handleResumeActivity(IBinder token, boolean finalStateRequest, boolean isForward,
String reason) {
// If we are getting ready to gc after going to the background, well
// we are back active so skip it.
unscheduleGcIdler();
mSomeActivitiesChanged = true;

// TODO Push resumeArgs into the activity for consideration
//调用了performResumeActivity方法执行生命周期中的onResume过程
//通过token返回之前创建的ActivityClientRecord对象
final ActivityClientRecord r = performResumeActivity(token, finalStateRequest, reason);
···
final Activity a = r.activity;
···
boolean willBeVisible = !a.mStartedActivity;
if (!willBeVisible) {
try {
willBeVisible = ActivityManager.getService().willActivityBeVisible(
a.getActivityToken());
} catch (RemoteException e) {
throw e.rethrowFromSystemServer();
}
}
if (r.window == null && !a.mFinished && willBeVisible) {
//获取activity的window对象
r.window = r.activity.getWindow();
//获取decorView
View decor = r.window.getDecorView();
//decorView设置为不可见状态
decor.setVisibility(View.INVISIBLE);
//获取WindowManager对象
ViewManager wm = a.getWindowManager();
WindowManager.LayoutParams l = r.window.getAttributes();
a.mDecor = decor;
l.type = WindowManager.LayoutParams.TYPE_BASE_APPLICATION;
l.softInputMode |= forwardBit;
if (r.mPreserveWindow) {
a.mWindowAdded = true;
r.mPreserveWindow = false;
// Normally the ViewRoot sets up callbacks with the Activity
// in addView->ViewRootImpl#setView. If we are instead reusing
// the decor view we have to notify the view root that the
// callbacks may have changed.
ViewRootImpl impl = decor.getViewRootImpl();
if (impl != null) {
impl.notifyChildRebuilt();
}
}
if (a.mVisibleFromClient) {
if (!a.mWindowAdded) {
a.mWindowAdded = true;
//WindowManager的adView方法添加decorView
wm.addView(decor, l);
} else {
// The activity will get a callback for this {@link LayoutParams} change
// earlier. However, at that time the decor will not be set (this is set
// in this method), so no action will be taken. This call ensures the
// callback occurs with the decor set.
//如果decorview被设置过了的话,那么Window状态改变就调用回调方法
a.onWindowAttributesChanged(l);
}
}

// If the window has already been added, but during resume
// we started another activity, then don't yet make the
// window visible.
} else if (!willBeVisible) {
if (localLOGV) Slog.v(TAG, "Launch " + r + " mStartedActivity set");
r.hideForNow = true;
}
···
WindowManager.LayoutParams l = r.window.getAttributes();
if ((l.softInputMode
& WindowManager.LayoutParams.SOFT_INPUT_IS_FORWARD_NAVIGATION)
!= forwardBit) {
l.softInputMode = (l.softInputMode
& (~WindowManager.LayoutParams.SOFT_INPUT_IS_FORWARD_NAVIGATION))
| forwardBit;
if (r.activity.mVisibleFromClient) {
ViewManager wm = a.getWindowManager();
View decor = r.window.getDecorView();
wm.updateViewLayout(decor, l);
}
}

r.activity.mVisibleFromServer = true;
mNumVisibleActivities++;
if (r.activity.mVisibleFromClient) {
r.activity.makeVisible();
}
}
···
}

这一步首先会执行handleResumeActivity方法完成生命周期的onResume方法,然后获取前面创建的ActivityClientRecord、PhoneWindow、DecorView、WindowManager等对象并调用WindowManager的addView方法;WindowMnager设个抽象类,实现类是WindowMnagerImpl,所以真正调用的是它的addView方法:

public final class WindowManagerImpl implements WindowManager {
public void addView(@NonNull View view, @NonNull ViewGroup.LayoutParams params) {
applyDefaultToken(params);
mGlobal.addView(view, params, mContext.getDisplay(), mParentWindow);
}
}

可以发现WindowManagerImpl并没有实现addView方法,而是交给了WindowManagerGlobal来处理;实际上除了addView添加View方法以外,更新视图的updataViewLayout和删除View的removeView方法也都交给了了WindowManagerGlobal来处理。WindowManagerImpl这种实现方式是典型的桥接模式,将所有的工作都委托给了WindowManagerGlobal来实现。现在看看WindowManagerGlobal的addView的实现:

public void addView(View view, ViewGroup.LayoutParams params,
Display display, Window parentWindow) {
//检查参数是否合法
if (view == null) {
throw new IllegalArgumentException("view must not be null");
}
if (display == null) {
throw new IllegalArgumentException("display must not be null");
}
if (!(params instanceof WindowManager.LayoutParams)) {
throw new IllegalArgumentException("Params must be WindowManager.LayoutParams");
}
//如果是子Window还需要调整参数
final WindowManager.LayoutParams wparams = (WindowManager.LayoutParams) params;
if (parentWindow != null) {
parentWindow.adjustLayoutParamsForSubWindow(wparams);
} else {
// If there's no parent, then hardware acceleration for this view is
// set from the application's hardware acceleration setting.
final Context context = view.getContext();
if (context != null
&& (context.getApplicationInfo().flags
& ApplicationInfo.FLAG_HARDWARE_ACCELERATED) != 0) {
wparams.flags |= WindowManager.LayoutParams.FLAG_HARDWARE_ACCELERATED;
}
}

ViewRootImpl root;
View panelParentView = null;

···
root = new ViewRootImpl(view.getContext(), display);

view.setLayoutParams(wparams);
//注释1
mViews.add(view);
mRoots.add(root);
mParams.add(wparams);

// do this last because it fires off messages to start doing things
//调用ViewRootImpl来更新界面
try {
root.setView(view, wparams, panelParentView);
} catch (RuntimeException e) {
// BadTokenException or InvalidDisplayException, clean up.
if (index >= 0) {
removeViewLocked(index, true);
}
throw e;
}
}
}

看到注释1处,首先需要介绍几个WindowManagerGlobal中比较重要的成员变量:

private final ArrayList<View> mViews = new ArrayList<View>();
private final ArrayList<ViewRootImpl> mRoots = new ArrayList<ViewRootImpl>();
private final ArrayList<WindowManager.LayoutParams> mParams =
new ArrayList<WindowManager.LayoutParams>();
private final ArraySet<View> mDyingViews = new ArraySet<View>();

上面的这几个变量中,mViews存储的是所有Window所对应的View,mRoots存储的是所有Window所对应的ViewRootImpl,mParams存储的是所有Window所对应的布局参数,而mDyingViews存储的是那些正在被删除的View对象,也就是被调用removeView方法还没执行完成。注释1处就会将Window中的一些对象存储到上述容器中。然后更新界面完成Window的添加,调用了ViewRootImpl的setView方法。

更新界面完成Window添加

了解过View的绘制的应该知道,该操作也是由ViewRootImpl来完成的,这里也不例外。通过调用setView方法然后内部调用requestLayout方法来完成异步刷新请求:

public void setView(View view, WindowManager.LayoutParams attrs, View panelParentView) {
synchronized (this) {
if (mView == null) {
mView = view;

//省略部分代码
mAdded = true;
int res; /* = WindowManagerImpl.ADD_OKAY; */

// Schedule the first layout -before- adding to the window
// manager, to make sure we do the relayout before receiving
// any other events from the system.
//异步刷新请求 开始View的绘制流程
requestLayout();
if ((mWindowAttributes.inputFeatures
& WindowManager.LayoutParams.INPUT_FEATURE_NO_INPUT_CHANNEL) == 0) {
mInputChannel = new InputChannel();
}
mForceDecorViewVisibility = (mWindowAttributes.privateFlags
& PRIVATE_FLAG_FORCE_DECOR_VIEW_VISIBILITY) != 0;
try {
mOrigWindowType = mWindowAttributes.type;
mAttachInfo.mRecomputeGlobalAttributes = true;
collectViewAttributes();
//注释1
res = mWindowSession.addToDisplay(mWindow, mSeq, mWindowAttributes,
getHostVisibility(), mDisplay.getDisplayId(), mWinFrame,
mAttachInfo.mContentInsets, mAttachInfo.mStableInsets,
mAttachInfo.mOutsets, mAttachInfo.mDisplayCutout, mInputChannel);
} catch (RemoteException e) {
mAdded = false;
mView = null;
mAttachInfo.mRootView = null;
mInputChannel = null;
mFallbackEventHandler.setView(null);
unscheduleTraversals();
setAccessibilityFocus(null, null);
throw new RuntimeException("Adding window failed", e);
} finally {
if (restore) {
attrs.restore();
}
}

if (mTranslator != null) {
mTranslator.translateRectInScreenToAppWindow(mAttachInfo.mContentInsets);
}
mPendingOverscanInsets.set(0, 0, 0, 0);
mPendingContentInsets.set(mAttachInfo.mContentInsets);
mPendingStableInsets.set(mAttachInfo.mStableInsets);
mPendingDisplayCutout.set(mAttachInfo.mDisplayCutout);
mPendingVisibleInsets.set(0, 0, 0, 0);
mAttachInfo.mAlwaysConsumeNavBar =
(res & WindowManagerGlobal.ADD_FLAG_ALWAYS_CONSUME_NAV_BAR) != 0;
mPendingAlwaysConsumeNavBar = mAttachInfo.mAlwaysConsumeNavBar;
if (DEBUG_LAYOUT) Log.v(mTag, "Added window " + mWindow);
if (res < WindowManagerGlobal.ADD_OKAY) {
mAttachInfo.mRootView = null;
mAdded = false;
mFallbackEventHandler.setView(null);
unscheduleTraversals();
setAccessibilityFocus(null, null);
···

if (view instanceof RootViewSurfaceTaker) {
mInputQueueCallback =
((RootViewSurfaceTaker)view).willYouTakeTheInputQueue();
}
if (mInputChannel != null) {
if (mInputQueueCallback != null) {
mInputQueue = new InputQueue();
mInputQueueCallback.onInputQueueCreated(mInputQueue);
}
mInputEventReceiver = new WindowInputEventReceiver(mInputChannel,
Looper.myLooper());
}

view.assignParent(this);
mAddedTouchMode = (res & WindowManagerGlobal.ADD_FLAG_IN_TOUCH_MODE) != 0;
mAppVisible = (res & WindowManagerGlobal.ADD_FLAG_APP_VISIBLE) != 0;

if (mAccessibilityManager.isEnabled()) {
mAccessibilityInteractionConnectionManager.ensureConnection();
}

if (view.getImportantForAccessibility() == View.IMPORTANT_FOR_ACCESSIBILITY_AUTO) {
view.setImportantForAccessibility(View.IMPORTANT_FOR_ACCESSIBILITY_YES);
}

// Set up the input pipeline.
CharSequence counterSuffix = attrs.getTitle();
mSyntheticInputStage = new SyntheticInputStage();
InputStage viewPostImeStage = new ViewPostImeInputStage(mSyntheticInputStage);
InputStage nativePostImeStage = new NativePostImeInputStage(viewPostImeStage,
"aq:native-post-ime:" + counterSuffix);
InputStage earlyPostImeStage = new EarlyPostImeInputStage(nativePostImeStage);
InputStage imeStage = new ImeInputStage(earlyPostImeStage,
"aq:ime:" + counterSuffix);
InputStage viewPreImeStage = new ViewPreImeInputStage(imeStage);
InputStage nativePreImeStage = new NativePreImeInputStage(viewPreImeStage,
"aq:native-pre-ime:" + counterSuffix);

mFirstInputStage = nativePreImeStage;
mFirstPostImeInputStage = earlyPostImeStage;
mPendingInputEventQueueLengthCounterName = "aq:pending:" + counterSuffix;
}
}
}

setView内部通过requestLayout方法实现异步刷新请求,该方法内部会开始View的绘制流程:

public void requestLayout() {
if (!mHandlingLayoutInLayoutRequest) {
checkThread();
mLayoutRequested = true;
//View绘制流程的入口
scheduleTraversals();
}
}

这里首先检查是否是创建View的线程,因为只有创建这些View的线程才可以操作这些View,然后调用了scheduleTraversals方法开始View的绘制流程,这里就不往里看了;但由于其内部实现方式View的绘制流程实际上在WindowSession的addToDisplay之后执行,这部分之后再细谈。接着看注释1处,通过调用mWindowSession的addToDisplay方法来完成最终的Window的添加过程:

// frameworks/base/services/core/java/com/android/server/wm/Session.java
public int addToDisplay(IWindow window, int seq, WindowManager.LayoutParams attrs,
int viewVisibility, int displayId, Rect outContentInsets, Rect outStableInsets,
Rect outOutsets, InputChannel outInputChannel) {
return mService.addWindow(this, window, seq, attrs, viewVisibility, displayId,
outContentInsets, outStableInsets, outOutsets, outInputChannel);
}

mWindowSession是一个IWindowSession对象,也就是一个Binder,它是在ViewRootImpl构造方法中被创建的,也就是之前WindowManagerGlobal创建ViewRootImpl的时候。每个应用进程中只会有一个mWindowSession对象,WMS为每一个应用进程分配一个Session对象,应用进程通过这个对象与WindowManagerService通信。所以这里调用了WindowManagerService的addWindow方法

// frameworks/base/services/core/java/com/android/server/wm/WindowManagerService.java
public int addWindow(Session session, IWindow client, int seq,
LayoutParams attrs, int viewVisibility, int displayId, Rect outFrame,
Rect outContentInsets, Rect outStableInsets, Rect outOutsets,
DisplayCutout.ParcelableWrapper outDisplayCutout, InputChannel outInputChannel) {
int[] appOp = new int[1];
int res = mPolicy.checkAddPermission(attrs, appOp);
if (res != WindowManagerGlobal.ADD_OKAY) {
return res;
}

boolean reportNewConfig = false;
WindowState parentWindow = null;
long origId;
final int callingUid = Binder.getCallingUid();
final int type = attrs.type;

synchronized(mWindowMap) {
if (!mDisplayReady) {
throw new IllegalStateException("Display has not been initialialized");
}
// 获取DisplayContent
final DisplayContent displayContent = getDisplayContentOrCreate(displayId);

....

AppWindowToken atoken = null;
final boolean hasParent = parentWindow != null;
// 调用displayContent的getWindowToken函数创建WindowToken
// WindowToken保存在displayContent的mTokenMap哈希表中
// Use existing parent window token for child windows since they go in the same token
// as there parent window so we can apply the same policy on them.
WindowToken token = displayContent.getWindowToken(
hasParent ? parentWindow.mAttrs.token : attrs.token);
// If this is a child window, we want to apply the same type checking rules as the
// parent window type.
final int rootType = hasParent ? parentWindow.mAttrs.type : type;

boolean addToastWindowRequiresToken = false;

if (token == null) {
....

final IBinder binder = attrs.token != null ? attrs.token : client.asBinder();
final boolean isRoundedCornerOverlay =
(attrs.privateFlags & PRIVATE_FLAG_IS_ROUNDED_CORNERS_OVERLAY) != 0;
// 如果未能从displayContent获取到WindowToken则新建一个WindowToken
token = new WindowToken(this, binder, type, false, displayContent,
session.mCanAddInternalSystemWindow, isRoundedCornerOverlay);
} else if (rootType >= FIRST_APPLICATION_WINDOW && rootType <= LAST_APPLICATION_WINDOW) {
// 如果Window的类型为APPLICATION_WINDOW则将WindowToken转为AppWindowToken
atoken = token.asAppWindowToken();
if (atoken == null) {
...
}
...

// 创建WindowState保存Window
final WindowState win = new WindowState(this, session, client, token, parentWindow,
appOp[0], seq, attrs, viewVisibility, session.mUid,
session.mCanAddInternalSystemWindow);

...

// 为Window注册InputChannel
final boolean openInputChannels = (outInputChannel != null
&& (attrs.inputFeatures & INPUT_FEATURE_NO_INPUT_CHANNEL) == 0);
if (openInputChannels) {
win.openInputChannel(outInputChannel);
}
...

// 调用WindowState的attach函数
win.attach();
mWindowMap.put(client.asBinder(), win);

...

// 将新建的WindowState添加到WindowContainer的管理中,WindowContainer是WindowToken的父类
win.mToken.addWindow(win);
...

return res;
}

上面函数主要的工作就是创建了一个WindowState对象,并调用了它的attach函数:

// frameworks/base/services/core/java/com/android/server/wm/WindowState.java	
void attach() {
if (localLOGV) Slog.v(TAG, "Attaching " + this + " token=" + mToken);
mSession.windowAddedLocked(mAttrs.packageName);
}

调用了Session的windowAddedLocked方法,内部创建了一个SurfaceSession对象:

// frameworks/base/services/core/java/com/android/server/wm/Session.java
void windowAddedLocked(String packageName) {
mPackageName = packageName;
mRelayoutTag = "relayoutWindow: " + mPackageName;
if (mSurfaceSession == null) {
if (WindowManagerService.localLOGV) Slog.v(
TAG_WM, "First window added to " + this + ", creating SurfaceSession");
mSurfaceSession = new SurfaceSession();

if (SHOW_TRANSACTIONS) Slog.i(
TAG_WM, " NEW SURFACE SESSION " + mSurfaceSession);
mService.mSessions.add(this);
if (mLastReportedAnimatorScale != mService.getCurrentAnimatorScale()) {
mService.dispatchNewAnimatorScaleLocked(this);
}
}
mNumWindow++;
}

SurfaceSession对象承担了应用程序与SurfaceFlinger之间的通信过程,每一个需要与SurfaceFlinger进程交互的应用程序端都需要创建一个SurfaceSession对象。

小结

到这里addToDisplay方法就分析完了,Window的添加请求是交给了WindowManagerService来处理的,具体的添加细节与实现原理就不再深入探索了,本文主要了解Window在启动过程的添加流程。

Author: zhf
Link: http://yoursite.com/2019/08/08/浅谈Window视图绑定与工作原理/
Copyright Notice: All articles in this blog are licensed under CC BY-NC-SA 4.0 unless stating additionally.
Donate
  • 微信
  • 支付寶