浅谈App启动流程

本篇文章是基于android-9.0.0_r8分支的代码进行分析的,想要看framwork层源码的笔者推荐以下两种方式:

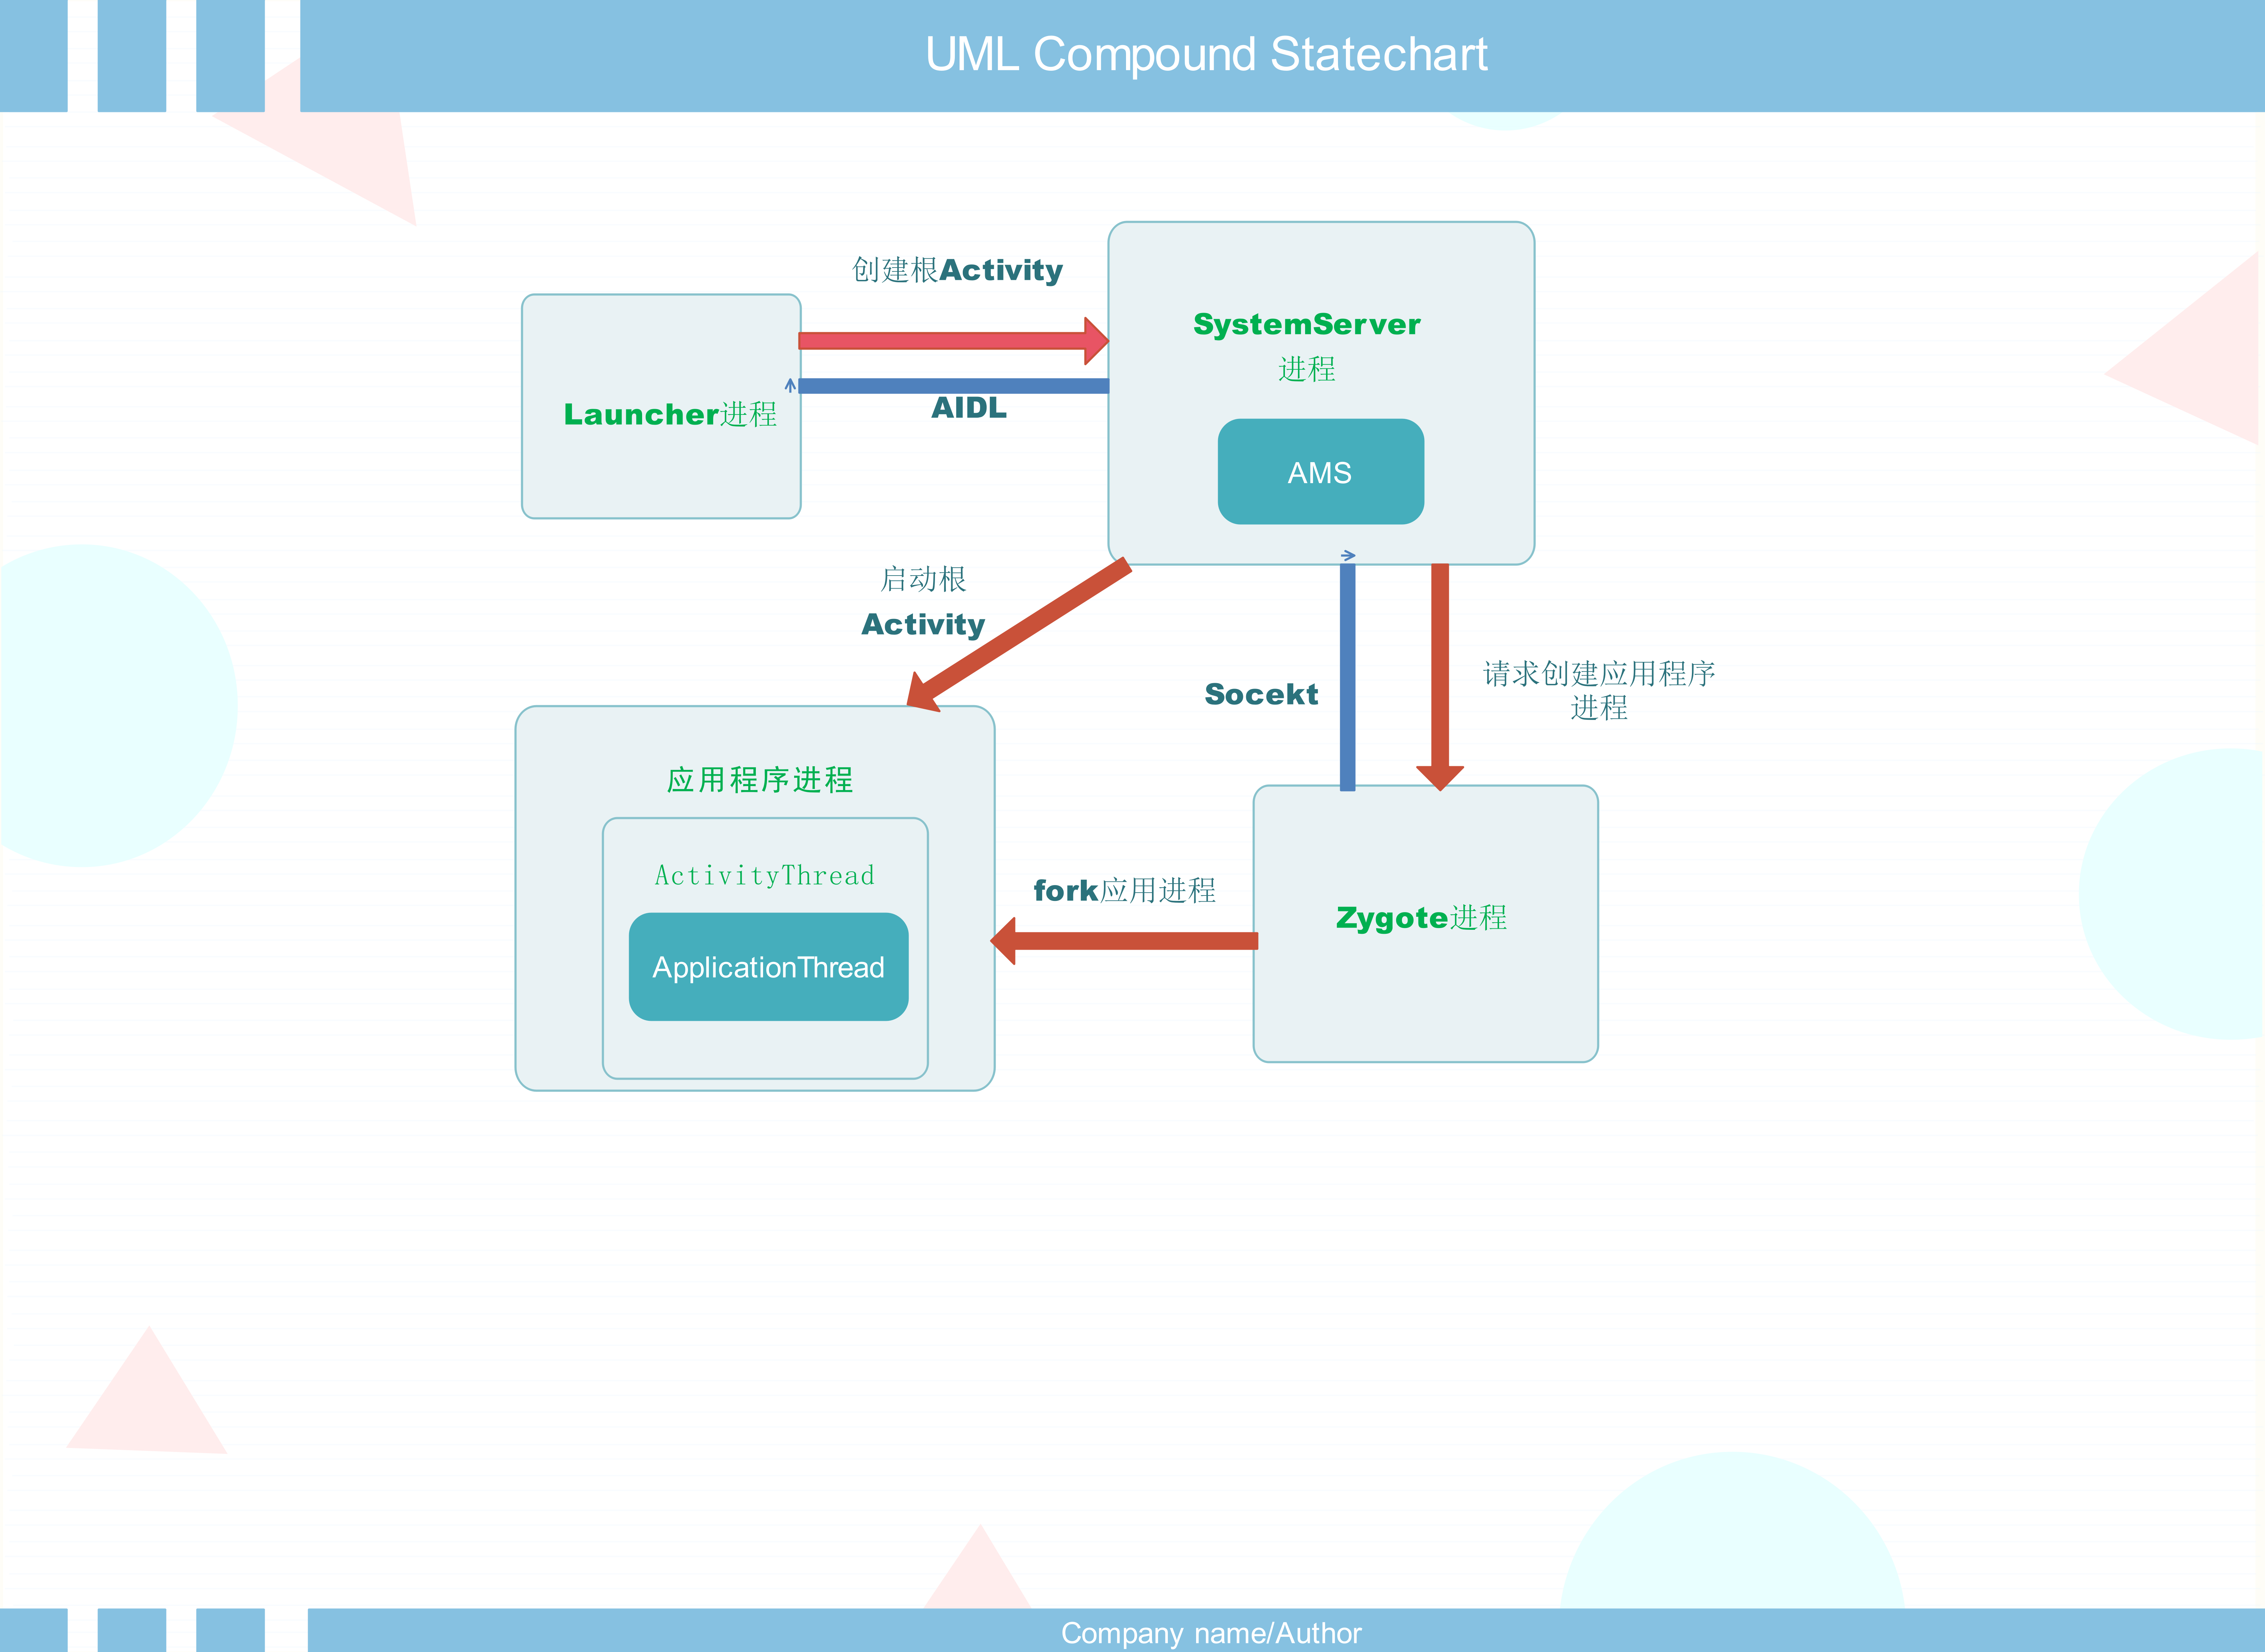
从桌面图标的点击 Luancher——AMS

Launcher简介

在系统启动的最后一步会启动一个应用程序来显示系统中已经安装的应用程序,这个应用程序就叫做Launcher。Launcher在启动的过程中会请求PackageManagerService返回系统中已经安装的应用程序的信息,并将这些信息封装成一个快捷图标列表在系统桌面上,这样用户点击这些快捷方式图标来启动应用程序。

简而言之:作为Android系统中应用程序或其他桌面组件的管理者,负责显示、管理以及程序启动入口

当我们点击桌面图标到app开始启动,这个过程是从Luancher类开始的,Luancher继承于activity,他也实现了onClick方法,我们很容易想到在这个onClick方法里就有桌面图标点击事件的监听,即启动的入口:

public void onClick(View v) {
...
Object tag = v.getTag();
if (tag instanceof ShortcutInfo) {
// 从快捷方式图标启动
onClickAppShortcut(v);
} else if (tag instanceof FolderInfo) {
// 文件夹
if (v instanceof FolderIcon) {
onClickFolderIcon(v);
}
} else if (v == mAllAppsButton) {
// “所有应用”按钮
onClickAllAppsButton(v);
} else if (tag instanceof AppInfo) {
// 从“所有应用”中启动的应用
startAppShortcutOrInfoActivity(v);
} else if (tag instanceof LauncherAppWidgetInfo) {
// 组件
if (v instanceof PendingAppWidgetHostView) {
onClickPendingWidget((PendingAppWidgetHostView) v);
}
}
}

我们看从快捷方式启动的onClickAppShortcut方法的实现:

/**
* Event handler for an app shortcut click.
*
* @param v The view that was clicked. Must be a tagged with a {@link ShortcutInfo}.
*/
protected void onClickAppShortcut(final View v) {

Object tag = v.getTag();
if (!(tag instanceof ShortcutInfo)) {
throw new IllegalArgumentException("Input must be a Shortcut");
}

// Open shortcut
final ShortcutInfo shortcut = (ShortcutInfo) tag;

if (shortcut.isDisabled != 0) {
if ((shortcut.isDisabled &
~ShortcutInfo.FLAG_DISABLED_SUSPENDED &
~ShortcutInfo.FLAG_DISABLED_QUIET_USER) == 0) {
//如果应用程序仅因上述标志而被禁用,则无论如
//何都会启动活动。框架将告诉用户应用程序暂停的原因。

} else {
···
// Check for abandoned promise
if ((v instanceof BubbleTextView) && shortcut.isPromise()) {
String packageName = shortcut.intent.getComponent() != null ?
shortcut.intent.getComponent().getPackageName() : shortcut.intent.getPackage();
if (!TextUtils.isEmpty(packageName)) {
onClickPendingAppItem(v, packageName,
shortcut.hasStatusFlag(ShortcutInfo.FLAG_INSTALL_SESSION_ACTIVE));
return;
}
}
// 启动Activity
startAppShortcutOrInfoActivity(v);
}

这里调用了startAppShortcutOrInfoActivity方法,之后的调用分别为startAppShortcutOrInfoActivity到startActivitySafely方法,在startActivitySafely方法里的实现如下:

public boolean startActivitySafely(View v, Intent intent, ItemInfo item) {
······
//启动新的任务栈
intent.addFlags(Intent.FLAG_ACTIVITY_NEW_TASK);
if (v != null) {
intent.setSourceBounds(getViewBounds(v));
}
try {
······
if (user == null || user.equals(Process.myUserHandle())) {
// 启动活动
startActivity(intent, optsBundle);
} else {
LauncherAppsCompat.getInstance(this).startActivityForProfile(
intent.getComponent(), user, intent.getSourceBounds(), optsBundle);
}
return true;
} catch (ActivityNotFoundException|SecurityException e) {
······
}
return false;
}

Activity启动入口

Launcher继承于Activity类,而Activity类实现了startActivity函数,因此,这里就调用了Activity.startActivity函数,而这个startActivity方法又是我们开发中经常使用的方法,所以这里我将它做为了Activity的入口。看看startActivity干了什么:

public class Activity extends ContextThemeWrapper
implements LayoutInflater.Factory,
Window.Callback, KeyEvent.Callback,
OnCreateContextMenuListener, ComponentCallbacks {
......

@Override
public void startActivity(Intent intent) {
startActivityForResult(intent, -1);
}
......
public void startActivityForResult(Intent intent, int requestCode) {
//mParent是一个activity对象,此时条件成立
if (mParent == null) {
// 调用 Instrumentation 的 execStartActivity 方法
Instrumentation.ActivityResult ar =
mInstrumentation.execStartActivity(
this, mMainThread.getApplicationThread(), mToken, this,
intent, requestCode);
if (ar != null) {
mMainThread.sendActivityResult(
mToken, mEmbeddedID, requestCode, ar.getResultCode(),
ar.getResultData());
}
//此时requestCode =-1
if (requestCode >= 0) {
mStartedActivity = true;
}
cancelInputsAndStartExitTransition(options);
} else {
if (options != null) {
mParent.startActivityFromChild(this, intent, requestCode, options);
} else {
mParent.startActivityFromChild(this, intent, requestCode);
}
}
}
public void startActivityFromChild(@NonNull Activity child, @RequiresPermission Intent intent,
int requestCode, @Nullable Bundle options) {
...
Instrumentation.ActivityResult ar =
mInstrumentation.execStartActivity(
this, mMainThread.getApplicationThread(), mToken, child,
intent, requestCode, options);
...
}
}

我们看到在startActivity方法里,直接调用了startActivityForResult方法,传入的-1表示不需要这个Actvity结束后的返回结果,再接着看startActivityForResult方法,这里有一个mParent字段,他其实是一个Activity对象。因为是第一次启动,也就是启动的应用程序的根Activity,所以这个mParent肯定为空,然后执行了Instrumentation.ActivityResult的execStartActivity方法,即使mParent不为空,调用的startActivityFromChild方法内也调用的是Instrumentation.ActivityResult的execStartActivity方法。ActivityResult是Instrumentation的内部类,代表着Activity的启动结果数据,而Instrumentation的作用则是监控整个APP运行流程、交互流程。这一点可以通过源码上的注释发现:

/**
* Base class for implementing application instrumentation code. When running
* with instrumentation turned on, this class will be instantiated for you
* before any of the application code, allowing you to monitor all of the
* interaction the system has with the application. An Instrumentation
* implementation is described to the system through an AndroidManifest.xml's
* <instrumentation> tag.
*/
public class Instrumentation {

/**
* Description of a Activity execution result to return to the original
* activity.
*/
public static final class ActivityResult {

那么这个execStartActivity方法里又做了什么呢,再看:

public ActivityResult execStartActivity( Context who, IBinder contextThread, IBinder token, Activity target, Intent intent, int requestCode, Bundle options) {


IApplicationThread whoThread = (IApplicationThread) contextThread;
...

if (mActivityMonitors != null) {
synchronized (mSync) {
final int N = mActivityMonitors.size();
for (int i=0; i<N; i++) {
final ActivityMonitor am = mActivityMonitors.get(i);
if (am.match(who, null, intent)) {
am.mHits++;
//当该monitor阻塞activity启动,则直接返回
if (am.isBlocking()) {
return requestCode >= 0 ? am.getResult() : null;
}
break;
}
}
}
}
try {
intent.migrateExtraStreamToClipData();
intent.prepareToLeaveProcess();
int result = ActivityManager.getService()
.startActivity(whoThread, who.getBasePackageName(), intent,
intent.resolveTypeIfNeeded(who.getContentResolver()),
token, target != null ? target.mEmbeddedID : null,
requestCode, 0, null, options);
//检查activity是否启动成功
checkStartActivityResult(result, intent);
} catch (RemoteException e) {
throw new RuntimeException("Failure from system", e);
}
return null;
}

我们看第一句,contextThread是一个IBinder对象,实际上它也是IApplicationThread 的实现类,IApplicationThread 继承了IInterface,简单看看:

/**
* System private API for communicating with the application. This is given to
* the activity manager by an application when it starts up, for the activity
* manager to tell the application about things it needs to do.
*
* {@hide}
*/
public interface IApplicationThread extends IInterface {
void schedulePauseActivity(IBinder token, boolean finished, boolean userLeaving,
int configChanges, boolean dontReport) throws RemoteException;
void scheduleStopActivity(IBinder token, boolean showWindow,
int configChanges) throws RemoteException;
void scheduleWindowVisibility(IBinder token, boolean showWindow) throws RemoteException;
void scheduleSleeping(IBinder token, boolean sleeping) throws RemoteException;
void scheduleResumeActivity(IBinder token, int procState, boolean isForward, Bundle resumeArgs)
throws RemoteException;
void scheduleSendResult(IBinder token, List<ResultInfo> results) throws RemoteException;
void scheduleLaunchActivity(Intent intent, IBinder token, int ident,
ActivityInfo info, Configuration curConfig, Configuration overrideConfig,
CompatibilityInfo compatInfo, String referrer, IVoiceInteractor voiceInteractor,
int procState, Bundle state, PersistableBundle persistentState,
List<ResultInfo> pendingResults, List<ReferrerIntent> pendingNewIntents,
boolean notResumed, boolean isForward, ProfilerInfo profilerInfo) throws RemoteException;
void scheduleRelaunchActivity(IBinder token, List<ResultInfo> pendingResults,
List<ReferrerIntent> pendingNewIntents, int configChanges, boolean notResumed,
Configuration config, Configuration overrideConfig) throws RemoteException;
void scheduleNewIntent(List<ReferrerIntent> intent, IBinder token) throws RemoteException;
void scheduleDestroyActivity(IBinder token, boolean finished,
int configChanges) throws RemoteException;
void scheduleReceiver(Intent intent, ActivityInfo info, CompatibilityInfo compatInfo,
int resultCode, String data, Bundle extras, boolean sync,
int sendingUser, int processState) throws RemoteException;
// 省略多个方法
void scheduleBindService(IBinder token,
Intent intent, boolean rebind, int processState) throws RemoteException;
void scheduleUnbindService(IBinder token,
Intent intent) throws RemoteException;
//省略多个方法
void scheduleStopService(IBinder token) throws RemoteException;
//省略多个方法
void bindApplication(String packageName, ApplicationInfo info, List<ProviderInfo> providers,
ComponentName testName, ProfilerInfo profilerInfo, Bundle testArguments,
IInstrumentationWatcher testWatcher, IUiAutomationConnection uiAutomationConnection,
int debugMode, boolean openGlTrace, boolean restrictedBackupMode, boolean persistent,
Configuration config, CompatibilityInfo compatInfo, Map<String, IBinder> services,
Bundle coreSettings) throws RemoteException;
void scheduleExit() throws RemoteException;
// 省略多行代码
void scheduleRegisteredReceiver(IIntentReceiver receiver, Intent intent,
int resultCode, String data, Bundle extras, boolean ordered,
boolean sticky, int sendingUser, int processState) throws RemoteException;
void scheduleLowMemory() throws RemoteException;
void scheduleActivityConfigurationChanged(IBinder token, Configuration overrideConfig)
throws RemoteException;
//省略多个方法
void scheduleTrimMemory(int level) throws RemoteException;
//省略多个方法
}

看到这些方法,例如schedulePauseActivity,scheduleResumeActivity等,我们不难发现这个IApplicationThread好像与Activity的生命周期相关,而scheduleBindService、scheduleUnbindService等方法由于service的绑定等操作相关,所以IApplicationThread的实现类ApplicationThread主要完成Activity、service的创建等相关操作的。

然后再看 ActivityManager.getService().startActivity这一块,首先看看ActivityManager.getService()方法:

@UnsupportedAppUsage
public static IActivityManager getService() {
return IActivityManagerSingleton.get();
}

@UnsupportedAppUsage
private static final Singleton<IActivityManager> IActivityManagerSingleton =
new Singleton<IActivityManager>() {
@Override
protected IActivityManager create() {
// 向 ServiceManager 查询一个 key 为 Context.ACTIVITY_SERVICE" 的引用
final IBinder b = ServiceManager.getService(Context.ACTIVITY_SERVICE);
final IActivityManager am = IActivityManager.Stub.asInterface(b);
return am;
}
};
\android\out\target\common\obj\JAVA_LIBRARIES\framework_intermediates\core\java\android\app\IActivityManager.java

public static android.app.IActivityManager asInterface(android.os.IBinder obj) {
if ((obj==null)) {
return null;
}
android.os.IInterface iin = obj.queryLocalInterface(DESCRIPTOR);
if (((iin!=null)&&(iin instanceof android.app.IActivityManager))) {
return ((android.app.IActivityManager)iin);
}
return new android.app.IActivityManager.Stub.Proxy(obj);
}

通过源码我们看到返回的是一个IActivitryManager,首先需要从ServiceManager中通过Context.ACTIVITY_SERVICE的一个字符串作为Key去查询(在ServiceManager中注册过的service会通过一个Map保存),然后返回了一个IBinder,然后又通过AIDL的方式,调用了IActivityManager.Stub.asInterface(b)方法返回一个IActivitryManager。需要注意的是,这里返回的代理对象并不是原来版本的ActivityManagerProxy对象,因为在API26之后就不再有ActivityManagerProxy这个类了,并且ActivityManagerNative也将被废弃,现在的AMN已经没有多少代码了,这里返回的应该是IActivityManager.Stub的内部类对象IActivityManager.Stub.Proxy,通过AIDL的方式在编译时会产生IActivityManager.java文件。那么这里最终是由谁去执行startActivity方法的呢,显然他应该是IActivityManager的实现类,没错就是ActivityManagerService。这样,IActivityManager.Stub与相当于一个Binder的客户端而ActivityManagerService相当于Binder的服务端,这样当IActivityManager.Stub.Proxy调用接口方法的时候底层通过Binder driver就会将请求数据与请求传递给server端,并在server端执行具体的接口逻辑。

在看AMS的startActivity之前,我们还要看看这个checkStartActivityResult方法:

public static void checkStartActivityResult(int res, Object intent) {
if (!ActivityManager.isStartResultFatalError(res)) {
return;
}
switch (res) {
case ActivityManager.START_INTENT_NOT_RESOLVED:
case ActivityManager.START_CLASS_NOT_FOUND:
if (intent instanceof Intent && ((Intent)intent).getComponent() != null)
throw new ActivityNotFoundException(
"Unable to find explicit activity class "
+ ((Intent)intent).getComponent().toShortString()
+ "; have you declared this activity in your AndroidManifest.xml?");
throw new ActivityNotFoundException(
"No Activity found to handle " + intent);
case ActivityManager.START_PERMISSION_DENIED:
throw new SecurityException("Not allowed to start activity "
+ intent);
case ActivityManager.START_FORWARD_AND_REQUEST_CONFLICT:
throw new AndroidRuntimeException(
"FORWARD_RESULT_FLAG used while also requesting a result");
case ActivityManager.START_NOT_ACTIVITY:
throw new IllegalArgumentException(
"PendingIntent is not an activity");
case ActivityManager.START_NOT_VOICE_COMPATIBLE:
throw new SecurityException(
"Starting under voice control not allowed for: " + intent);
case ActivityManager.START_VOICE_NOT_ACTIVE_SESSION:
throw new IllegalStateException(
"Session calling startVoiceActivity does not match active session");
case ActivityManager.START_VOICE_HIDDEN_SESSION:
throw new IllegalStateException(
"Cannot start voice activity on a hidden session");
case ActivityManager.START_ASSISTANT_NOT_ACTIVE_SESSION:
throw new IllegalStateException(
"Session calling startAssistantActivity does not match active session");
case ActivityManager.START_ASSISTANT_HIDDEN_SESSION:
throw new IllegalStateException(
"Cannot start assistant activity on a hidden session");
case ActivityManager.START_CANCELED:
throw new AndroidRuntimeException("Activity could not be started for "
+ intent);
default:
throw new AndroidRuntimeException("Unknown error code "
+ res + " when starting " + intent);
}
}

顾名思义这个方法就是用来检查启动Activity的,代码中也可以很清晰的发现,这里会抛出各种比如异常,比如我们没有在AndroidManifest中声明activity就会抛出这个ActivityNotFoundException,提示have you declared this activity in your AndroidManifest.xml。
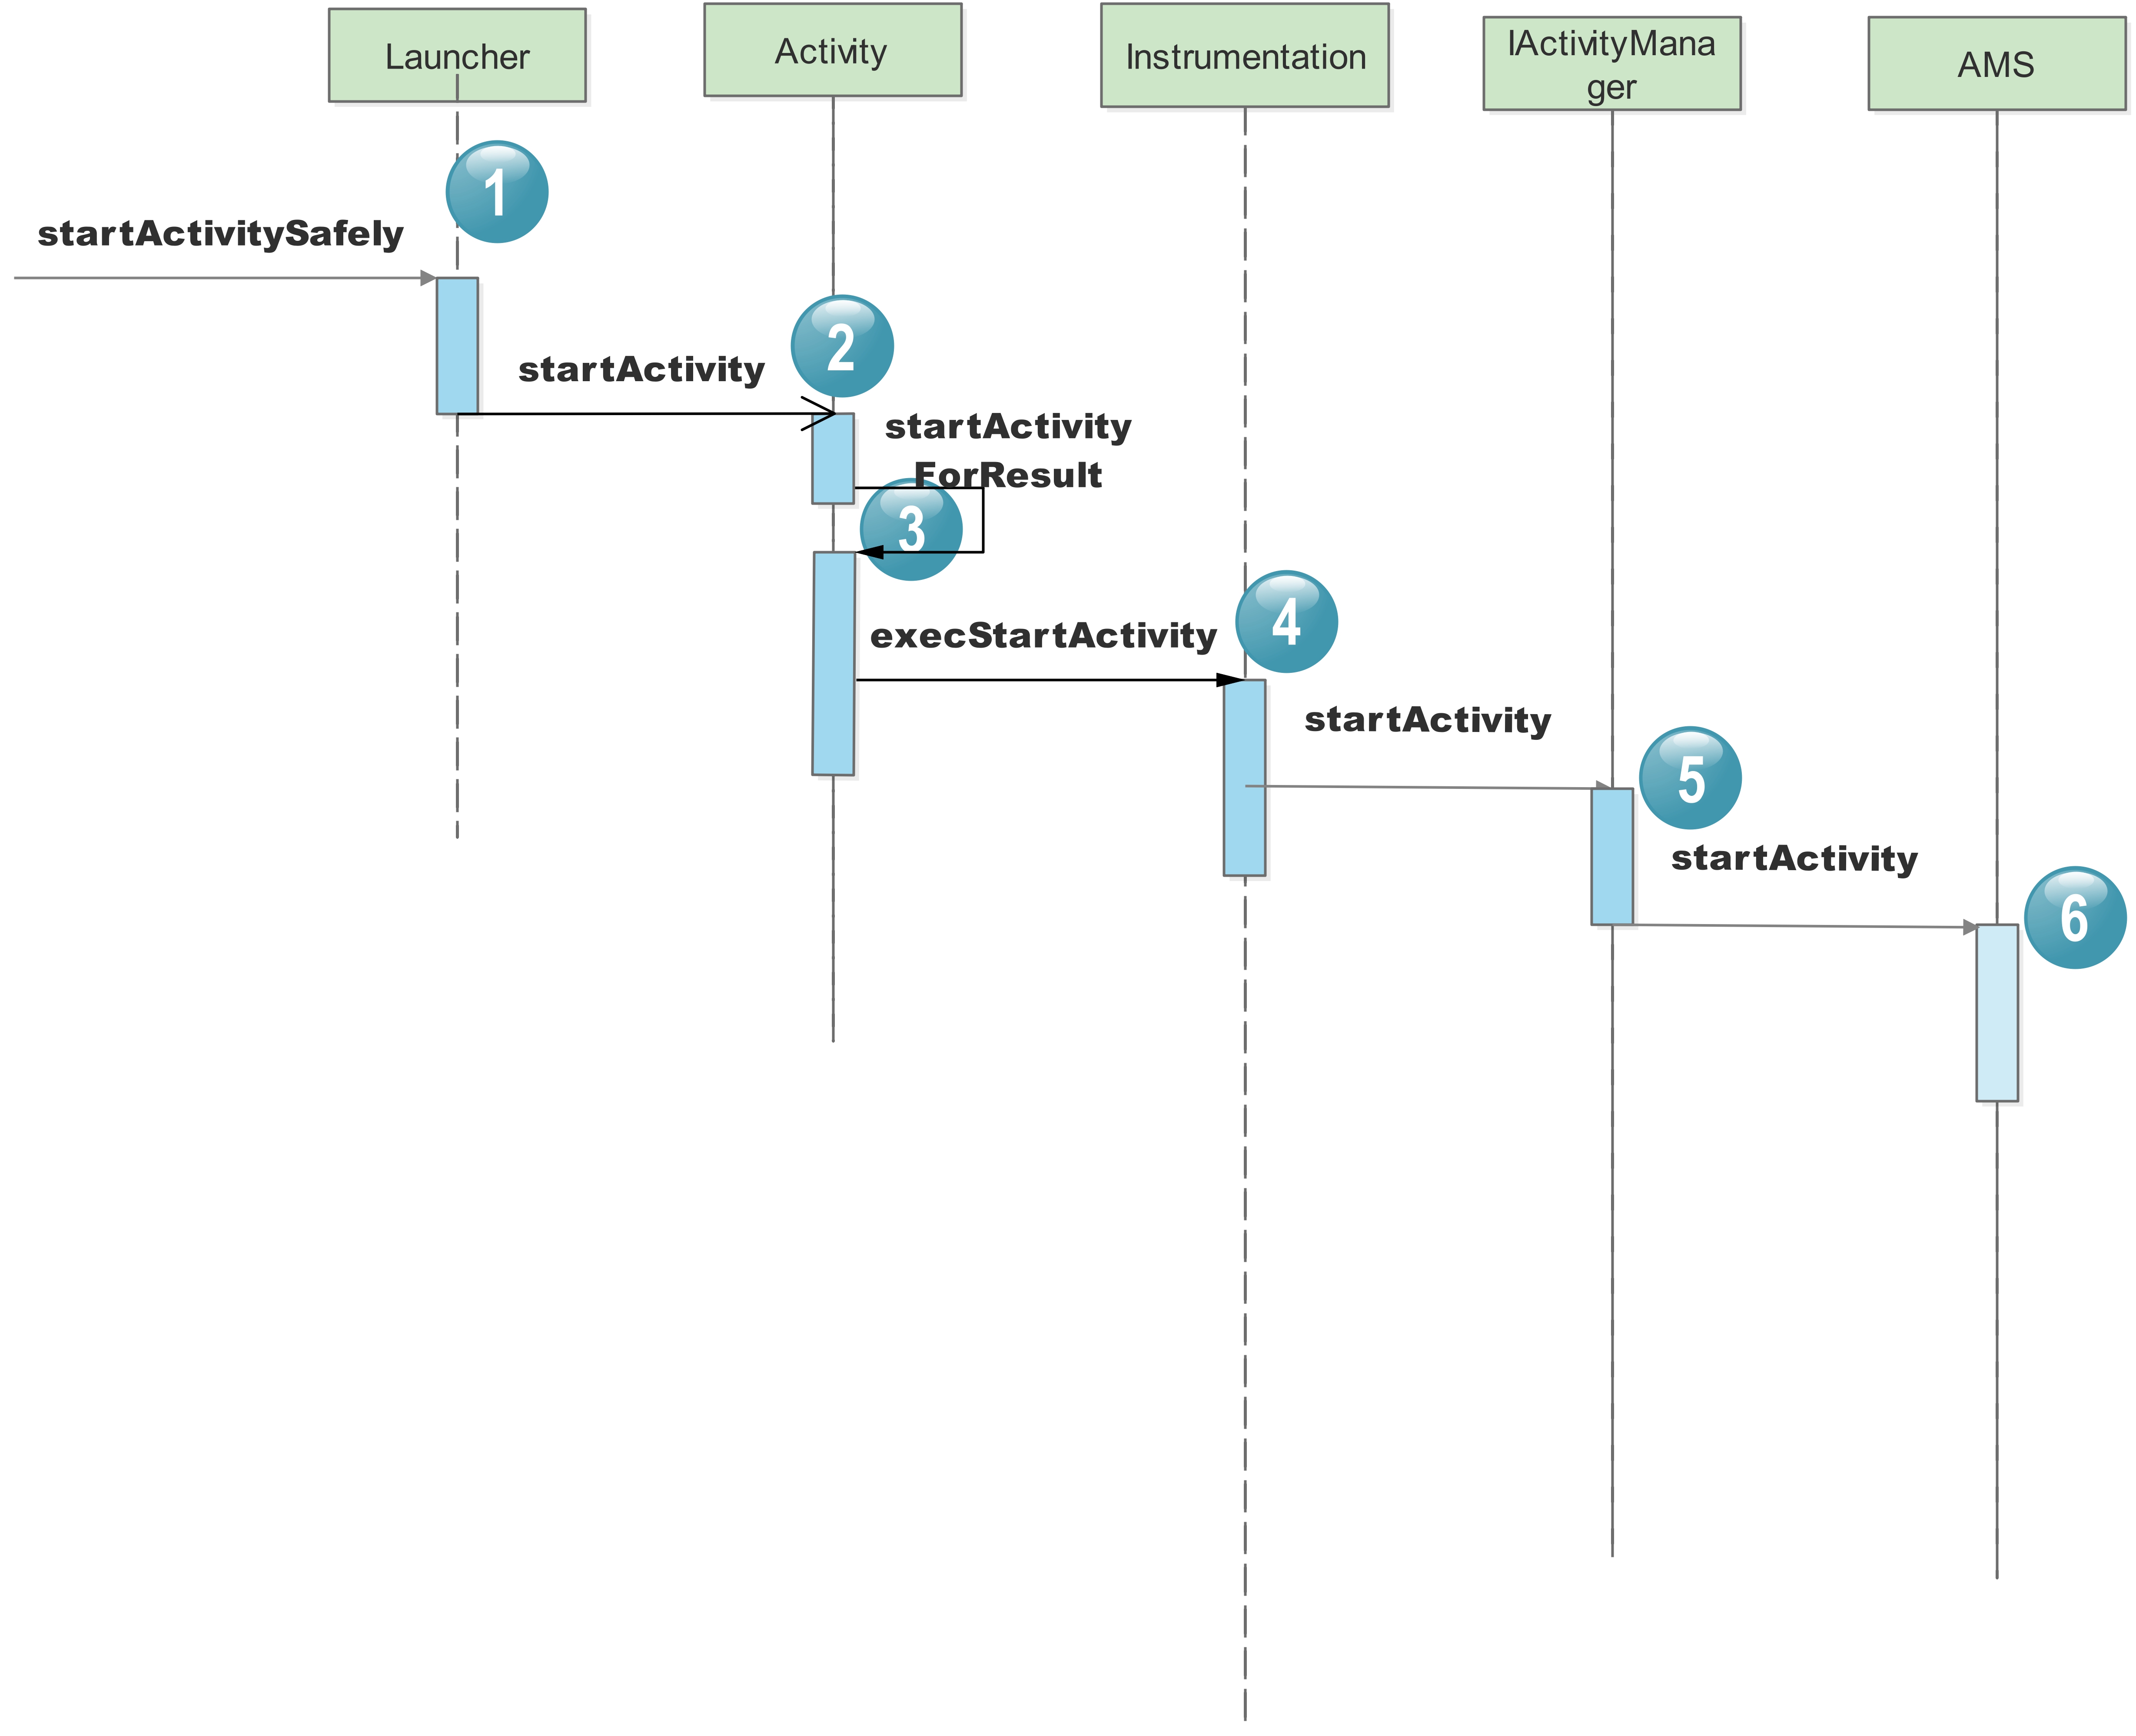
小结

所谓一图胜千言,我们看看第一部分的时序图

Launcher-AMS

AMS——zygote过程

获取了ActivityManager的服务(AMS)来启动Activity后,我们就要来看他的实现类AMS的startActivity方法:

public class ActivityManagerService extends IActivityManager.Stub
implements Watchdog.Monitor, BatteryStatsImpl.BatteryCallback {

/**
* Priority we boost main thread and RT of top app to.
*/
public static final int TOP_APP_PRIORITY_BOOST = -10;

private static final String TAG = TAG_WITH_CLASS_NAME ? "ActivityManagerService" : TAG_AM;
private static final String TAG_BACKUP = TAG + POSTFIX_BACKUP;
@Override
public final int startActivity(IApplicationThread caller, String callingPackage,
Intent intent, String resolvedType, IBinder resultTo, String resultWho, int requestCode,
int startFlags, ProfilerInfo profilerInfo, Bundle bOptions) {
return startActivityAsUser(caller, callingPackage, intent, resolvedType, resultTo,
resultWho, requestCode, startFlags, profilerInfo, bOptions,
UserHandle.getCallingUserId()); //注释1
}

@Override
public final int startActivityAsUser(IApplicationThread caller, String callingPackage,
Intent intent, String resolvedType, IBinder resultTo, String resultWho, int requestCode,
int startFlags, ProfilerInfo profilerInfo, Bundle bOptions, int userId) {
return startActivityAsUser(caller, callingPackage, intent, resolvedType, resultTo,
resultWho, requestCode, startFlags, profilerInfo, bOptions, userId,
true /*validateIncomingUser*/); //注释2
}

public final int startActivityAsUser(IApplicationThread caller, String callingPackage,
Intent intent, String resolvedType, IBinder resultTo, String resultWho, int requestCode,
int startFlags, ProfilerInfo profilerInfo, Bundle bOptions, int userId,
boolean validateIncomingUser) {
//确定进程是否被隔离了 隔离了就直接抛异常
enforceNotIsolatedCaller("startActivity"); //注释3

//检查启动Activity的userId是否是合法的
userId = mActivityStartController.checkTargetUser(userId, validateIncomingUser,
Binder.getCallingPid(), Binder.getCallingUid(), "startActivityAsUser"); //注释4

// TODO: Switch to user app stacks here.
return mActivityStartController.obtainStarter(intent, "startActivityAsUser") //注释5
.setCaller(caller)
.setCallingPackage(callingPackage)
.setResolvedType(resolvedType)
.setResultTo(resultTo)
.setResultWho(resultWho)
.setRequestCode(requestCode)
.setStartFlags(startFlags)
.setProfilerInfo(profilerInfo)
.setActivityOptions(bOptions)
.setMayWait(userId)
.execute();
}
}

首先在startActivity方法中又直接调用了父类的startActivityAsUser,最后调用自己的startActivityAsUser方法,注释3处会检查该进程是否被隔离了,然后检查启动activity的userId是否合法,最后进行了一长串的链式调用,我们看最后的execute方法。

/**
* Controller for interpreting how and then launching an activity.
*
* This class collects all the logic for determining how an intent and flags should be turned into
* an activity and associated task and stack.
*/
class ActivityStarter {
/**
* Starts an activity based on the request parameters provided earlier.
* @return The starter result.
*/
int execute() {
try {
// TODO(b/64750076): Look into passing request directly to these methods to allow
// for transactional diffs and preprocessing.
if (mRequest.mayWait) {
return startActivityMayWait(mRequest.caller, mRequest.callingUid, //注释1
mRequest.callingPackage, mRequest.intent, mRequest.resolvedType,
mRequest.voiceSession, mRequest.voiceInteractor, mRequest.resultTo,
mRequest.resultWho, mRequest.requestCode, mRequest.startFlags,
mRequest.profilerInfo, mRequest.waitResult, mRequest.globalConfig,
mRequest.activityOptions, mRequest.ignoreTargetSecurity, mRequest.userId,
mRequest.inTask, mRequest.reason,
mRequest.allowPendingRemoteAnimationRegistryLookup);
} else {
return startActivity(mRequest.caller, mRequest.intent, //注释2
mRequest.ephemeralIntent,
mRequest.resolvedType, mRequest.activityInfo, mRequest.resolveInfo,
mRequest.voiceSession, mRequest.voiceInteractor, mRequest.resultTo,
mRequest.resultWho, mRequest.requestCode, mRequest.callingPid,
mRequest.callingUid, mRequest.callingPackage, mRequest.realCallingPid,
mRequest.realCallingUid, mRequest.startFlags, mRequest.activityOptions,
mRequest.ignoreTargetSecurity, mRequest.componentSpecified,
mRequest.outActivity, mRequest.inTask, mRequest.reason,
mRequest.allowPendingRemoteAnimationRegistryLookup);
}
} finally {
onExecutionComplete();
}
}

这里有一个判断,他会返回true,为什么呢,在之前链式调用setMayWait方法时:

ActivityStarter setMayWait(int userId) {
mRequest.mayWait = true;
mRequest.userId = userId;
return this;
}

可见,下一步会调用startActivityMayWait方法,内部调用了startActivityLocked方法,然后进入startActivity方法,之后又调用了startActivityUnchecked方法,然后调用了ActivityStackSupervisor#resumeFocusedStackTopActivityLocked,这个时候启动过程就从ActivityStarter 转移到ActivityStackSupervisor,源码调用过程如下:

//这里传进来的参数中比之前多了一个TaskRecord对象,代表着启动的activity所在的栈
private int startActivityMayWait(IApplicationThread caller, int callingUid,
String callingPackage, Intent intent, String resolvedType,
IVoiceInteractionSession voiceSession, IVoiceInteractor voiceInteractor,
IBinder resultTo, String resultWho, int requestCode, int startFlags,
ProfilerInfo profilerInfo, WaitResult outResult,
Configuration globalConfig, SafeActivityOptions options, boolean ignoreTargetSecurity,
int userId, TaskRecord inTask, String reason,
boolean allowPendingRemoteAnimationRegistryLookup) {

···
// 获得调用者的uid和pid
final int realCallingPid = Binder.getCallingPid();
final int realCallingUid = Binder.getCallingUid();
···
// 从PackageManagerService处获取应用信息,PackageManagerService会解析应用的AndroidManifest.xml文件
//然后把应用信息保存
ResolveInfo rInfo = mSupervisor.resolveIntent(intent, resolvedType, userId,
0 /* matchFlags */,computeResolveFilterUid(
callingUid, realCallingUid, mRequest.filterCallingUid));

if (rInfo == null) {
...
}

// 根据ResolveInfo取得ActivityInfo,ActivityInfo保存着Activity的基本信息
// Collect information about the target of the Intent.
ActivityInfo aInfo = mSupervisor.resolveActivity(intent, rInfo, startFlags, profilerInfo);
···

//ActivityRecord也是activity任务栈模型中十分重要的一个数据结构 用来描述activity 记录了很多关键信息
final ActivityRecord[] outRecord = new ActivityRecord[1];

// 调用startActivity 并将TaskRecord 和 ActivityRecord传了进去
int res = startActivity(caller, intent, ephemeralIntent, resolvedType, aInfo, rInfo,
voiceSession, voiceInteractor, resultTo, resultWho, requestCode, callingPid,
callingUid, callingPackage, realCallingPid, realCallingUid, startFlags, options,
ignoreTargetSecurity, componentSpecified, outRecord, inTask, reason,
allowPendingRemoteAnimationRegistryLookup);

Binder.restoreCallingIdentity(origId);
···

if (outResult != null) {
// 处理返回结果
...
}
mSupervisor.getActivityMetricsLogger().notifyActivityLaunched(res, outRecord[0]);
return res;
}

之后进入了startActivivty方法中,这里有三个重载方法,比较长,我们一点点来看:

private int startActivity(IApplicationThread caller, Intent intent, Intent ephemeralIntent,
String resolvedType, ActivityInfo aInfo, ResolveInfo rInfo,
IVoiceInteractionSession voiceSession, IVoiceInteractor voiceInteractor,
IBinder resultTo, String resultWho, int requestCode, int callingPid, int callingUid,
String callingPackage, int realCallingPid, int realCallingUid, int startFlags,
SafeActivityOptions options, boolean ignoreTargetSecurity, boolean componentSpecified,
ActivityRecord[] outActivity, TaskRecord inTask, String reason,
boolean allowPendingRemoteAnimationRegistryLookup) {
//启动的理由不能为空
if (TextUtils.isEmpty(reason)) {
throw new IllegalArgumentException("Need to specify a reason.");
}
mLastStartReason = reason;
mLastStartActivityTimeMs = System.currentTimeMillis();
mLastStartActivityRecord[0] = null;
//紧接着调用了另一个startActivity方法
mLastStartActivityResult = startActivity(caller, intent, ephemeralIntent, resolvedType,
aInfo, rInfo, voiceSession, voiceInteractor, resultTo, resultWho, requestCode,
callingPid, callingUid, callingPackage, realCallingPid, realCallingUid, startFlags,
options, ignoreTargetSecurity, componentSpecified, mLastStartActivityRecord,
inTask, allowPendingRemoteAnimationRegistryLookup);

if (outActivity != null) {
// mLastStartActivityRecord[0] is set in the call to startActivity above.
outActivity[0] = mLastStartActivityRecord[0];
}

return getExternalResult(mLastStartActivityResult);
}

}

//这一个startActivity重载方法代码较长 截取了部分重要部分分析
private int startActivity(IApplicationThread caller, Intent intent, Intent ephemeralIntent,
String resolvedType, ActivityInfo aInfo, ResolveInfo rInfo,
IVoiceInteractionSession voiceSession, IVoiceInteractor voiceInteractor,
IBinder resultTo, String resultWho, int requestCode, int callingPid, int callingUid,
String callingPackage, int realCallingPid, int realCallingUid, int startFlags,
SafeActivityOptions options,
boolean ignoreTargetSecurity, boolean componentSpecified, ActivityRecord[] outActivity,
TaskRecord inTask, boolean allowPendingRemoteAnimationRegistryLookup) {
int err = ActivityManager.START_SUCCESS;
// Pull the optional Ephemeral Installer-only bundle out of the options early.
final Bundle verificationBundle
= options != null ? options.popAppVerificationBundle() : null;
//ProcessRecord类似于ActivityRecord 用于描述一个应用程序进程
ProcessRecord callerApp = null;
//这个caller是一个IApplicationThread类型的对象 对应的是Launcher进程的ApplicationThread对象
if (caller != null) {
//得到Launcher进程的callerApp
callerApp = mService.getRecordForAppLocked(caller);
if (callerApp != null) {
//获取Launcher进程的pid 和 uid
callingPid = callerApp.pid;
callingUid = callerApp.info.uid;
} else {
Slog.w(TAG, "Unable to find app for caller " + caller
+ " (pid=" + callingPid + ") when starting: "
+ intent.toString());
err = ActivityManager.START_PERMISSION_DENIED;
}
}

//此处省略大量代码细节
······

//创建即将要启动的activity的描述类ActivityRecord
ActivityRecord r = new ActivityRecord(mService, callerApp, callingPid, callingUid,
callingPackage, intent, resolvedType, aInfo, mService.getGlobalConfiguration(),
resultRecord, resultWho, requestCode, componentSpecified, voiceSession != null,
mSupervisor, checkedOptions, sourceRecord);
//为outActivity赋值 之后的调用会将它传递下去
if (outActivity != null) {
outActivity[0] = r;
}

if (r.appTimeTracker == null && sourceRecord != null) {
// If the caller didn't specify an explicit time tracker, we want to continue
// tracking under any it has.
r.appTimeTracker = sourceRecord.appTimeTracker;
}

final ActivityStack stack = mSupervisor.mFocusedStack;

// If we are starting an activity that is not from the same uid as the currently resumed
// one, check whether app switches are allowed.
if (voiceSession == null && (stack.getResumedActivity() == null
|| stack.getResumedActivity().info.applicationInfo.uid != realCallingUid)) {
if (!mService.checkAppSwitchAllowedLocked(callingPid, callingUid,
realCallingPid, realCallingUid, "Activity start")) {
mController.addPendingActivityLaunch(new PendingActivityLaunch(r,
sourceRecord, startFlags, stack, callerApp));
ActivityOptions.abort(checkedOptions);
return ActivityManager.START_SWITCHES_CANCELED;
}
}

if (mService.mDidAppSwitch) {
// This is the second allowed switch since we stopped switches,
// so now just generally allow switches. Use case: user presses
// home (switches disabled, switch to home, mDidAppSwitch now true);
// user taps a home icon (coming from home so allowed, we hit here
// and now allow anyone to switch again).
mService.mAppSwitchesAllowedTime = 0;
} else {
mService.mDidAppSwitch = true;
}

mController.doPendingActivityLaunches(false);

return startActivity(r, sourceRecord, voiceSession, voiceInteractor, startFlags,
true /* doResume */, checkedOptions, inTask, outActivity);
}

//现在来看看最后一个startActivity方法做了哪些任务
private int startActivity(final ActivityRecord r, ActivityRecord sourceRecord,
IVoiceInteractionSession voiceSession, IVoiceInteractor voiceInteractor,
int startFlags, boolean doResume, ActivityOptions options, TaskRecord inTask,
ActivityRecord[] outActivity) {
//省略大量代码
······

// Should this be considered a new task?
int result = START_SUCCESS;
//启动根activity需要将flag设置为FLAG_ACTIVITY_NEW_TASK
if (mStartActivity.resultTo == null && mInTask == null && !mAddingToTask
&& (mLaunchFlags & FLAG_ACTIVITY_NEW_TASK) != 0) {
newTask = true;
//创建新的TaskRecord 用于描述新的Activity任务栈
result = setTaskFromReuseOrCreateNewTask(taskToAffiliate, topStack);
} else if (mSourceRecord != null) {
result = setTaskFromSourceRecord();
} else if (mInTask != null) {
result = setTaskFromInTask();
} else {
// This not being started from an existing activity, and not part of a new task...
// just put it in the top task, though these days this case should never happen.
setTaskToCurrentTopOrCreateNewTask();
}
if (result != START_SUCCESS) {
return result;
}

mService.grantUriPermissionFromIntentLocked(mCallingUid, mStartActivity.packageName,
mIntent, mStartActivity.getUriPermissionsLocked(), mStartActivity.userId);
mService.grantEphemeralAccessLocked(mStartActivity.userId, mIntent,
mStartActivity.appInfo.uid, UserHandle.getAppId(mCallingUid));
if (newTask) {
EventLog.writeEvent(EventLogTags.AM_CREATE_TASK, mStartActivity.userId,
mStartActivity.getTask().taskId);
}
ActivityStack.logStartActivity(
EventLogTags.AM_CREATE_ACTIVITY, mStartActivity, mStartActivity.getTask());
mTargetStack.mLastPausedActivity = null;

mSupervisor.sendPowerHintForLaunchStartIfNeeded(false /* forceSend */, mStartActivity);

mTargetStack.startActivityLocked(mStartActivity, topFocused, newTask, mKeepCurTransition,
mOptions);
if (mDoResume) {
final ActivityRecord topTaskActivity =
mStartActivity.getTask().topRunningActivityLocked();
if (!mTargetStack.isFocusable()
|| (topTaskActivity != null && topTaskActivity.mTaskOverlay
&& mStartActivity != topTaskActivity)) {
// If the activity is not focusable, we can't resume it, but still would like to
// make sure it becomes visible as it starts (this will also trigger entry
// animation). An example of this are PIP activities.
// Also, we don't want to resume activities in a task that currently has an overlay
// as the starting activity just needs to be in the visible paused state until the
// over is removed.
mTargetStack.ensureActivitiesVisibleLocked(null, 0, !PRESERVE_WINDOWS);
// Go ahead and tell window manager to execute app transition for this activity
// since the app transition will not be triggered through the resume channel.
mService.mWindowManager.executeAppTransition();
} else {
// If the target stack was not previously focusable (previous top running activity
// on that stack was not visible) then any prior calls to move the stack to the
// will not update the focused stack. If starting the new activity now allows the
// task stack to be focusable, then ensure that we now update the focused stack
// accordingly.
if (mTargetStack.isFocusable() && !mSupervisor.isFocusedStack(mTargetStack)) {
mTargetStack.moveToFront("startActivityUnchecked");
}

//进入ActivityStackSupervisor
mSupervisor.resumeFocusedStackTopActivityLocked(mTargetStack, mStartActivity,
mOptions);
}
} else if (mStartActivity != null) {
mSupervisor.mRecentTasks.add(mStartActivity.getTask());
}
mSupervisor.updateUserStackLocked(mStartActivity.userId, mTargetStack);

mSupervisor.handleNonResizableTaskIfNeeded(mStartActivity.getTask(), preferredWindowingMode,
preferredLaunchDisplayId, mTargetStack);

return START_SUCCESS;
}

这里来到了ActivityStackSupervisor这个类,上面简单提过一点ActivityStack的作用,而它主要是来管理ActivityStack的,继续看resumeFocusedStackTopActivityLocked方法又是如何运作的:

boolean resumeFocusedStackTopActivityLocked(
ActivityStack targetStack, ActivityRecord target, ActivityOptions targetOptions) {

if (!readyToResume()) {
return false;
}

if (targetStack != null && isFocusedStack(targetStack)) {
return targetStack.resumeTopActivityUncheckedLocked(target, targetOptions);
}

final ActivityRecord r = mFocusedStack.topRunningActivityLocked();
if (r == null || !r.isState(RESUMED)) {
mFocusedStack.resumeTopActivityUncheckedLocked(null, null);
} else if (r.isState(RESUMED)) {
// Kick off any lingering app transitions form the MoveTaskToFront operation.
mFocusedStack.executeAppTransition(targetOptions);
}

return false;
}

这个方法又调用了自身的resumeTopActivityInnerLocked方法,这个方法特别长,我们仔细看看:

private boolean resumeTopActivityInnerLocked(ActivityRecord prev, ActivityOptions options) {
if (!mService.mBooting && !mService.mBooted) {
// Not ready yet!
return false;
}

// 获取TaskRecord的栈顶Activity,如果正常的话这个ActivityRecord为待启动的Activity
// Find the next top-most activity to resume in this stack that is not finishing and is
// focusable. If it is not focusable, we will fall into the case below to resume the
// top activity in the next focusable task.
final ActivityRecord next = topRunningActivityLocked(true /* focusableOnly */);

final boolean hasRunningActivity = next != null;

...

// 将待启动的Activity从下面几个队列中移除
// The activity may be waiting for stop, but that is no longer
// appropriate for it.
mStackSupervisor.mStoppingActivities.remove(next);
mStackSupervisor.mGoingToSleepActivities.remove(next);
next.sleeping = false;
mStackSupervisor.mActivitiesWaitingForVisibleActivity.remove(next);

if (DEBUG_SWITCH) Slog.v(TAG_SWITCH, "Resuming " + next);

// 如果系统当前正在中断一个Activity,需要先等待那个Activity pause完毕,之后系统会重新调用resumeTopActivityInnerLocked函数,找到下一个要启动的Activity
// If we are currently pausing an activity, then don't do anything until that is done.
if (!mStackSupervisor.allPausedActivitiesComplete()) {
if (DEBUG_SWITCH || DEBUG_PAUSE || DEBUG_STATES) Slog.v(TAG_PAUSE,
"resumeTopActivityLocked: Skip resume: some activity pausing.");
if (DEBUG_STACK) mStackSupervisor.validateTopActivitiesLocked();
return false;
}

...

boolean pausing = mStackSupervisor.pauseBackStacks(userLeaving, next, false);
// mResumedActivity指向上一次启动的Activity,也就是当前界面显示的Activity
if (mResumedActivity != null) {
// 如果当前界面显示了一个Activity,那么在启动新的Activity之前
// 必须中断当前的Activity,也就是调用当前Activity的onPause函数
if (DEBUG_STATES) Slog.d(TAG_STATES,
"resumeTopActivityLocked: Pausing " + mResumedActivity);
pausing |= startPausingLocked(userLeaving, false, next, false);
}
if (pausing && !resumeWhilePausing) {
//如果系统正在中断当前启动的Activity,并且未设置FLAG_RESUME_WHILE_PAUSING标签则会
//进入该分支,等当前Activity中断完成之后会重新调用resumeTopActivityInnerLocked函数
if (DEBUG_SWITCH || DEBUG_STATES) Slog.v(TAG_STATES,
"resumeTopActivityLocked: Skip resume: need to start pausing");
// At this point we want to put the upcoming activity's process
// at the top of the LRU list, since we know we will be needing it
// very soon and it would be a waste to let it get killed if it
// happens to be sitting towards the end.
if (next.app != null && next.app.thread != null) {
// 在中断当前界面的Activity时,调整待启动Activity所在进程的优先级,保证其不被kill
mService.updateLruProcessLocked(next.app, true, null);
}
if (DEBUG_STACK) mStackSupervisor.validateTopActivitiesLocked();
if (lastResumed != null) {
lastResumed.setWillCloseOrEnterPip(true);
}

return true;
} else if (mResumedActivity == next && next.isState(RESUMED)
&& mStackSupervisor.allResumedActivitiesComplete()) {
// It is possible for the activity to be resumed when we paused back stacks above if the
// next activity doesn't have to wait for pause to complete.
// So, nothing else to-do except:
// Make sure we have executed any pending transitions, since there
// should be nothing left to do at this point.
executeAppTransition(options);
if (DEBUG_STATES) Slog.d(TAG_STATES,
"resumeTopActivityLocked: Top activity resumed (dontWaitForPause) " + next);
if (DEBUG_STACK) mStackSupervisor.validateTopActivitiesLocked();
return true;
}

// 若之前存在未正常结束的Activity,那么要优先结束掉这些Activity
// If the most recent activity was noHistory but was only stopped rather
// than stopped+finished because the device went to sleep, we need to make
// sure to finish it as we're making a new activity topmost.
if (shouldSleepActivities() && mLastNoHistoryActivity != null &&
!mLastNoHistoryActivity.finishing) {
if (DEBUG_STATES) Slog.d(TAG_STATES,
"no-history finish of " + mLastNoHistoryActivity + " on new resume");
requestFinishActivityLocked(mLastNoHistoryActivity.appToken, Activity.RESULT_CANCELED,
null, "resume-no-history", false);
mLastNoHistoryActivity = null;
}

...

ActivityStack lastStack = mStackSupervisor.getLastStack();
if (next.app != null && next.app.thread != null) {
// 如果待启动的Activity已有对应的进程存在,则只需要重启Activity
...

} else {
// Whoops, need to restart this activity!
if (!next.hasBeenLaunched) {
next.hasBeenLaunched = true;
} else {
if (SHOW_APP_STARTING_PREVIEW) {
next.showStartingWindow(null /* prev */, false /* newTask */,
false /* taskSwich */);
}
if (DEBUG_SWITCH) Slog.v(TAG_SWITCH, "Restarting: " + next);
}
if (DEBUG_STATES) Slog.d(TAG_STATES, "resumeTopActivityLocked: Restarting " + next);
//如果待启动的Activity进程不存在则调用ActivityStackSupervisor的startSpecificActivityLocked函数,启动整个进程
mStackSupervisor.startSpecificActivityLocked(next, true, true);
}

if (DEBUG_STACK) mStackSupervisor.validateTopActivitiesLocked();
return true;!
}

这个方法比较长,但是也可以清楚的发现些比较关键的地方:

  • 如果mResumedActivity不为空,则需要先暂停这个Activity。mResumedActivity代表当前已经存在于界面的Activity。当需要启动一个新的Activity时,需要先停止当前的Activity。这部分工作由startPausingLocked函数来完成。当前的Activity被中断后,将重新启动新的Activity。
  • 当mResumedActivity为空时,若待启动的Activity对应的进程已经存在,那么仅需要重新启动该Activity;否则,需要调用ActivityStackSupervisor的startSpecificActivityLocked函数,启动整个进程:
void startSpecificActivityLocked(ActivityRecord r,
boolean andResume, boolean checkConfig) {
// Is this activity's application already running?
ProcessRecord app = mService.getProcessRecordLocked(r.processName,
r.info.applicationInfo.uid, true);

getLaunchTimeTracker().setLaunchTime(r);

if (app != null && app.thread != null) {
try {
if ((r.info.flags&ActivityInfo.FLAG_MULTIPROCESS) == 0
|| !"android".equals(r.info.packageName)) {
// Don't add this if it is a platform component that is marked
// to run in multiple processes, because this is actually
// part of the framework so doesn't make sense to track as a
// separate apk in the process.
app.addPackage(r.info.packageName, r.info.applicationInfo.longVersionCode,
mService.mProcessStats);
}
realStartActivityLocked(r, app, andResume, checkConfig);
return;
} catch (RemoteException e) {
Slog.w(TAG, "Exception when starting activity "
+ r.intent.getComponent().flattenToShortString(), e);
}

// If a dead object exception was thrown -- fall through to
// restart the application.
}

mService.startProcessLocked(r.processName, r.info.applicationInfo, true, 0,
"activity", r.intent.getComponent(), false, false, true);
}

这个方法的内部实现可以发现它的作用是根据app进程是否存在来调用不同的方法,当app进程已经存在就直接调用了realStartActivityLocked方法,否则调用startProcessLocked方法,顾名思义这个方法将用于app进程的创建,当然真正的创建工作并不是他完成的,想知道他是在哪实现的,还需要知道mService是什么,通过构造方法我们发现,其实就是AMS:

public ActivityStackSupervisor(ActivityManagerService service, Looper looper) {
mService = service;
mLooper = looper;
mHandler = new ActivityStackSupervisorHandler(looper);
}

所以我们需要到AMS里去看看是如何实现的(4个重载方法,代码很长):

final ProcessRecord startProcessLocked(String processName,
ApplicationInfo info, boolean knownToBeDead, int intentFlags,
String hostingType, ComponentName hostingName, boolean allowWhileBooting,
boolean isolated, boolean keepIfLarge) {
return startProcessLocked(processName, info, knownToBeDead, intentFlags, hostingType,
hostingName, allowWhileBooting, isolated, 0 /* isolatedUid */, keepIfLarge,
null /* ABI override */, null /* entryPoint */, null /* entryPointArgs */,
null /* crashHandler */);
}

@GuardedBy("this")
final ProcessRecord startProcessLocked(String processName, ApplicationInfo info,
boolean knownToBeDead, int intentFlags, String hostingType, ComponentName hostingName,
boolean allowWhileBooting, boolean isolated, int isolatedUid, boolean keepIfLarge,
String abiOverride, String entryPoint, String[] entryPointArgs, Runnable crashHandler) {
long startTime = SystemClock.elapsedRealtime();
ProcessRecord app;
//如果这个ProcessRecord对象没有被隔离,那么调用
//getProcessRecordLocked方法获取
//否则为空
if (!isolated) {
// 根据processName和uid寻找是否已经存在processRecord
app = getProcessRecordLocked(processName, info.uid, keepIfLarge);
checkTime(startTime, "startProcess: after getProcessRecord");
···
} else {
// If this is an isolated process, it can't re-use an existing process.
app = null;
}
···
String hostingNameStr = hostingName != null
? hostingName.flattenToShortString() : null;

//如果app为空,则直接创建
if (app == null) {
checkTime(startTime, "startProcess: creating new process record");
app = newProcessRecordLocked(info, processName, isolated, isolatedUid);
if (app == null) {
Slog.w(TAG, "Failed making new process record for "
+ processName + "/" + info.uid + " isolated=" + isolated);
return null;
}
app.crashHandler = crashHandler;
app.isolatedEntryPoint = entryPoint;
app.isolatedEntryPointArgs = entryPointArgs;
checkTime(startTime, "startProcess: done creating new process record");
} else {
// If this is a new package in the process, add the package to the list
app.addPackage(info.packageName, info.versionCode, mProcessStats);
checkTime(startTime, "startProcess: added package to existing proc");
}
···
checkTime(startTime, "startProcess: stepping in to startProcess");
//创建是否成功的结果交给另一个startProcessLocked重载
final boolean success = startProcessLocked(app, hostingType, hostingNameStr, abiOverride);
checkTime(startTime, "startProcess: done starting proc!");
return success ? app : null;
}
@GuardedBy("this")
private final void startProcessLocked(ProcessRecord app,
String hostingType, String hostingNameStr) {
startProcessLocked(app, hostingType, hostingNameStr, null /* abiOverride */);
}

@GuardedBy("this")
private final boolean startProcessLocked(ProcessRecord app,
String hostingType, String hostingNameStr, String abiOverride) {
return startProcessLocked(app, hostingType, hostingNameStr,
false /* disableHiddenApiChecks */, abiOverride);
}

/**
* @return {@code true} if process start is successful, false otherwise.
*/
@GuardedBy("this")
private final boolean startProcessLocked(ProcessRecord app, String hostingType,
String hostingNameStr, boolean disableHiddenApiChecks, String abiOverride) {
if (app.pendingStart) {
return true;
}
long startTime = SystemClock.elapsedRealtime();
if (app.pid > 0 && app.pid != MY_PID) {
checkTime(startTime, "startProcess: removing from pids map");
synchronized (mPidsSelfLocked) {
mPidsSelfLocked.remove(app.pid);
mHandler.removeMessages(PROC_START_TIMEOUT_MSG, app);
}
checkTime(startTime, "startProcess: done removing from pids map");
app.setPid(0);
}
···
try {
try {
final int userId = UserHandle.getUserId(app.uid);
AppGlobals.getPackageManager().checkPackageStartable(app.info.packageName, userId);
} catch (RemoteException e) {
throw e.rethrowAsRuntimeException();
}

int uid = app.uid;
int[] gids = null;
int mountExternal = Zygote.MOUNT_EXTERNAL_NONE;
if (!app.isolated) {
int[] permGids = null;
try {
checkTime(startTime, "startProcess: getting gids from package manager");
final IPackageManager pm = AppGlobals.getPackageManager();
permGids = pm.getPackageGids(app.info.packageName,
MATCH_DEBUG_TRIAGED_MISSING, app.userId);
StorageManagerInternal storageManagerInternal = LocalServices.getService(
StorageManagerInternal.class);
mountExternal = storageManagerInternal.getExternalStorageMountMode(uid,
app.info.packageName);
} catch (RemoteException e) {
throw e.rethrowAsRuntimeException();
}

/*
* Add shared application and profile GIDs so applications can share some
* resources like shared libraries and access user-wide resources
*/
if (ArrayUtils.isEmpty(permGids)) {
gids = new int[3];
} else {
gids = new int[permGids.length + 3];
System.arraycopy(permGids, 0, gids, 3, permGids.length);
}
gids[0] = UserHandle.getSharedAppGid(UserHandle.getAppId(uid));
gids[1] = UserHandle.getCacheAppGid(UserHandle.getAppId(uid));
gids[2] = UserHandle.getUserGid(UserHandle.getUserId(uid));

// Replace any invalid GIDs
if (gids[0] == UserHandle.ERR_GID) gids[0] = gids[2];
if (gids[1] == UserHandle.ERR_GID) gids[1] = gids[2];
}
checkTime(startTime, "startProcess: building args");
if (mFactoryTest != FactoryTest.FACTORY_TEST_OFF) {
if (mFactoryTest == FactoryTest.FACTORY_TEST_LOW_LEVEL
&& mTopComponent != null
&& app.processName.equals(mTopComponent.getPackageName())) {
uid = 0;
}
if (mFactoryTest == FactoryTest.FACTORY_TEST_HIGH_LEVEL
&& (app.info.flags&ApplicationInfo.FLAG_FACTORY_TEST) != 0) {
uid = 0;
}
}
int runtimeFlags = 0;
if ((app.info.flags & ApplicationInfo.FLAG_DEBUGGABLE) != 0) {
runtimeFlags |= Zygote.DEBUG_ENABLE_JDWP;
runtimeFlags |= Zygote.DEBUG_JAVA_DEBUGGABLE;
// Also turn on CheckJNI for debuggable apps. It's quite
// awkward to turn on otherwise.
runtimeFlags |= Zygote.DEBUG_ENABLE_CHECKJNI;
}
···
if (mNativeDebuggingApp != null && mNativeDebuggingApp.equals(app.processName)) {
// Enable all debug flags required by the native debugger.
runtimeFlags |= Zygote.DEBUG_ALWAYS_JIT; // Don't interpret anything
runtimeFlags |= Zygote.DEBUG_GENERATE_DEBUG_INFO; // Generate debug info
runtimeFlags |= Zygote.DEBUG_NATIVE_DEBUGGABLE; // Disbale optimizations
mNativeDebuggingApp = null;
}

if (app.info.isPrivilegedApp() &&
DexManager.isPackageSelectedToRunOob(app.pkgList.keySet())) {
runtimeFlags |= Zygote.ONLY_USE_SYSTEM_OAT_FILES;
}

if (!disableHiddenApiChecks && !mHiddenApiBlacklist.isDisabled()) {
app.info.maybeUpdateHiddenApiEnforcementPolicy(
mHiddenApiBlacklist.getPolicyForPrePApps(),
mHiddenApiBlacklist.getPolicyForPApps());
@HiddenApiEnforcementPolicy int policy =
app.info.getHiddenApiEnforcementPolicy();
int policyBits = (policy << Zygote.API_ENFORCEMENT_POLICY_SHIFT);
if ((policyBits & Zygote.API_ENFORCEMENT_POLICY_MASK) != policyBits) {
throw new IllegalStateException("Invalid API policy: " + policy);
}
runtimeFlags |= policyBits;
}

String invokeWith = null;
if ((app.info.flags & ApplicationInfo.FLAG_DEBUGGABLE) != 0) {
// Debuggable apps may include a wrapper script with their library directory.
String wrapperFileName = app.info.nativeLibraryDir + "/wrap.sh";
StrictMode.ThreadPolicy oldPolicy = StrictMode.allowThreadDiskReads();
try {
if (new File(wrapperFileName).exists()) {
invokeWith = "/system/bin/logwrapper " + wrapperFileName;
}
} finally {
StrictMode.setThreadPolicy(oldPolicy);
}
}

String requiredAbi = (abiOverride != null) ? abiOverride : app.info.primaryCpuAbi;
if (requiredAbi == null) {
requiredAbi = Build.SUPPORTED_ABIS[0];
}

String instructionSet = null;
if (app.info.primaryCpuAbi != null) {
instructionSet = VMRuntime.getInstructionSet(app.info.primaryCpuAbi);
}

app.gids = gids;
app.requiredAbi = requiredAbi;
app.instructionSet = instructionSet;

// the per-user SELinux context must be set
if (TextUtils.isEmpty(app.info.seInfoUser)) {
Slog.wtf(TAG, "SELinux tag not defined",
new IllegalStateException("SELinux tag not defined for "
+ app.info.packageName + " (uid " + app.uid + ")"));
}
final String seInfo = app.info.seInfo
+ (TextUtils.isEmpty(app.info.seInfoUser) ? "" : app.info.seInfoUser);
// Start the process. It will either succeed and return a result containing
// the PID of the new process, or else throw a RuntimeException.
final String entryPoint = "android.app.ActivityThread";

return startProcessLocked(hostingType, hostingNameStr, entryPoint, app, uid, gids,
runtimeFlags, mountExternal, seInfo, requiredAbi, instructionSet, invokeWith,
startTime);
} catch (RuntimeException e) {
Slog.e(TAG, "Failure starting process " + app.processName, e);

// Something went very wrong while trying to start this process; one
// common case is when the package is frozen due to an active
// upgrade. To recover, clean up any active bookkeeping related to
// starting this process. (We already invoked this method once when
// the package was initially frozen through KILL_APPLICATION_MSG, so
// it doesn't hurt to use it again.)
forceStopPackageLocked(app.info.packageName, UserHandle.getAppId(app.uid), false,
false, true, false, false, UserHandle.getUserId(app.userId), "start failure");
return false;
}
}

@GuardedBy("this")
private boolean startProcessLocked(String hostingType, String hostingNameStr, String entryPoint,
ProcessRecord app, int uid, int[] gids, int runtimeFlags, int mountExternal,
String seInfo, String requiredAbi, String instructionSet, String invokeWith,
long startTime) {
app.pendingStart = true;
app.killedByAm = false;
app.removed = false;
app.killed = false;
final long startSeq = app.startSeq = ++mProcStartSeqCounter;
app.setStartParams(uid, hostingType, hostingNameStr, seInfo, startTime);
//如果进程启动为异步启动
if (mConstants.FLAG_PROCESS_START_ASYNC) {
···
final ProcessStartResult startResult = startProcess(app.hostingType, entryPoint,
app, app.startUid, gids, runtimeFlags, mountExternal, app.seInfo,
requiredAbi, instructionSet, invokeWith, app.startTime);
synchronized (ActivityManagerService.this) {
handleProcessStartedLocked(app, startResult, startSeq);
}
···
return true;
} else {
···
final ProcessStartResult startResult = startProcess(hostingType, entryPoint, app,
uid, gids, runtimeFlags, mountExternal, seInfo, requiredAbi, instructionSet,
invokeWith, startTime);
handleProcessStartedLocked(app, startResult.pid, startResult.usingWrapper,
startSeq, false);
···
return app.pid > 0;
}
}

private ProcessStartResult startProcess(String hostingType, String entryPoint,
ProcessRecord app, int uid, int[] gids, int runtimeFlags, int mountExternal,
String seInfo, String requiredAbi, String instructionSet, String invokeWith,
long startTime) {
···
final ProcessStartResult startResult;
//如果是"webview_service"类型的话
//调用startWebView方法
if (hostingType.equals("webview_service")) {
startResult = startWebView(entryPoint,
app.processName, uid, uid, gids, runtimeFlags, mountExternal,
app.info.targetSdkVersion, seInfo, requiredAbi, instructionSet,
app.info.dataDir, null,
new String[] {PROC_START_SEQ_IDENT + app.startSeq});
} else {
//调用Process#start方法
startResult = Process.start(entryPoint,
app.processName, uid, uid, gids, runtimeFlags, mountExternal,
app.info.targetSdkVersion, seInfo, requiredAbi, instructionSet,
app.info.dataDir, invokeWith,
new String[] {PROC_START_SEQ_IDENT + app.startSeq});
}
checkTime(startTime, "startProcess: returned from zygote!");
return startResult;
} finally {
Trace.traceEnd(Trace.TRACE_TAG_ACTIVITY_MANAGER);
}
}

这里出现了Process的start方法,那是不是说进程的创建就是它完成的呢,我们继续:

public static final ProcessStartResult start(final String processClass,
final String niceName,
int uid, int gid, int[] gids,
int runtimeFlags, int mountExternal,
int targetSdkVersion,
String seInfo,
String abi,
String instructionSet,
String appDataDir,
String invokeWith,
String[] zygoteArgs) {
//这里的zygoteProcess是一个ZygoteProcess对象
return zygoteProcess.start(processClass, niceName, uid, gid, gids,
runtimeFlags, mountExternal, targetSdkVersion, seInfo,
abi, instructionSet, appDataDir, invokeWith, zygoteArgs);
}

/** @hide */
public static final ProcessStartResult startWebView(final String processClass,
final String niceName,
int uid, int gid, int[] gids,
int runtimeFlags, int mountExternal,
int targetSdkVersion,
String seInfo,
String abi,
String instructionSet,
String appDataDir,
String invokeWith,
String[] zygoteArgs) {
return WebViewZygote.getProcess().start(processClass, niceName, uid, gid, gids,
runtimeFlags, mountExternal, targetSdkVersion, seInfo,
abi, instructionSet, appDataDir, invokeWith, zygoteArgs);
}

可以看到两种方式都不是在这里创建进程的,而是分别交给了ZygoteProcess和WebViewZygote来完成。注释中我写到zygoteProcess是一个ZygoteProcess对象是从何而来呢,先来看看:

public static final ZygoteProcess zygoteProcess =
new ZygoteProcess(ZYGOTE_SOCKET, SECONDARY_ZYGOTE_SOCKET);

public ZygoteProcess(String primarySocket, String secondarySocket) {
this(new LocalSocketAddress(primarySocket, LocalSocketAddress.Namespace.RESERVED),
new LocalSocketAddress(secondarySocket, LocalSocketAddress.Namespace.RESERVED));
}

public ZygoteProcess(LocalSocketAddress primarySocket, LocalSocketAddress secondarySocket) {
mSocket = primarySocket;
mSecondarySocket = secondarySocket;
}

public LocalSocketAddress getPrimarySocketAddress() {
return mSocket;
}

我们发现这里似乎用到了Socket的方式来实现跨进程通信,至于后面具体怎么实现,慢慢往后看。先来看看WebViewZygote.getProcess()方法做了什么,是不是拿到的也是一个ZygoteProcess对象呢:

private static ChildZygoteProcess sZygote;
public static ZygoteProcess getProcess() {
synchronized (sLock) {
//如果不为空 就直接返回这个sZygote
if (sZygote != null) return sZygote;
//不用想 这里肯定是创建一个ZygoteProcess
//并赋值给sZygote 然后返回
connectToZygoteIfNeededLocked();
return sZygote;
}
}

这里的sZygote是一个ChildZygoteProcess对象,实际上我们的才想也并没有错误,因为这个ChildZygoteProcess是ZygoteProcess的子类,其构造方法就是调用的ZygoteProcess的构造方法。那么现在就要看看ZygoteProcess的start方法又是如何实现的了:

public final Process.ProcessStartResult start(final String processClass,
final String niceName,
int uid, int gid, int[] gids,
int runtimeFlags, int mountExternal,
int targetSdkVersion,
String seInfo,
String abi,
String instructionSet,
String appDataDir,
String invokeWith,
String[] zygoteArgs) {
try {
return startViaZygote(processClass, niceName, uid, gid, gids,
runtimeFlags, mountExternal, targetSdkVersion, seInfo,
abi, instructionSet, appDataDir, invokeWith, false /* startChildZygote */,
zygoteArgs);
} catch (ZygoteStartFailedEx ex) {
Log.e(LOG_TAG,
"Starting VM process through Zygote failed");
throw new RuntimeException(
"Starting VM process through Zygote failed", ex);
}
}
private Process.ProcessStartResult startViaZygote(final String processClass,
final String niceName,
final int uid, final int gid,
final int[] gids,
int runtimeFlags, int mountExternal,
int targetSdkVersion,
String seInfo,
String abi,
String instructionSet,
String appDataDir,
String invokeWith,
boolean startChildZygote,
String[] extraArgs)
throws ZygoteStartFailedEx {
ArrayList<String> argsForZygote = new ArrayList<String>();

// --runtime-args, --setuid=, --setgid=,
// and --setgroups= must go first
argsForZygote.add("--runtime-args");
argsForZygote.add("--setuid=" + uid);
argsForZygote.add("--setgid=" + gid);
argsForZygote.add("--runtime-flags=" + runtimeFlags);
if (mountExternal == Zygote.MOUNT_EXTERNAL_DEFAULT) {
argsForZygote.add("--mount-external-default");
} else if (mountExternal == Zygote.MOUNT_EXTERNAL_READ) {
argsForZygote.add("--mount-external-read");
} else if (mountExternal == Zygote.MOUNT_EXTERNAL_WRITE) {
argsForZygote.add("--mount-external-write");
}
argsForZygote.add("--target-sdk-version=" + targetSdkVersion);

// --setgroups is a comma-separated list
if (gids != null && gids.length > 0) {
StringBuilder sb = new StringBuilder();
sb.append("--setgroups=");

int sz = gids.length;
for (int i = 0; i < sz; i++) {
if (i != 0) {
sb.append(',');
}
sb.append(gids[i]);
}

argsForZygote.add(sb.toString());
}

if (niceName != null) {
argsForZygote.add("--nice-name=" + niceName);
}

if (seInfo != null) {
argsForZygote.add("--seinfo=" + seInfo);
}

if (instructionSet != null) {
argsForZygote.add("--instruction-set=" + instructionSet);
}

if (appDataDir != null) {
argsForZygote.add("--app-data-dir=" + appDataDir);
}

if (invokeWith != null) {
argsForZygote.add("--invoke-with");
argsForZygote.add(invokeWith);
}

if (startChildZygote) {
argsForZygote.add("--start-child-zygote");
}

argsForZygote.add(processClass);

if (extraArgs != null) {
for (String arg : extraArgs) {
argsForZygote.add(arg);
}
}


//将大量的字符串添加到argsForZygote之后
//将argsForZygote发送到zygote进程并获取结果
synchronized(mLock) {
return zygoteSendArgsAndGetResult(openZygoteSocketIfNeeded(abi), argsForZygote);
}
}
private static Process.ProcessStartResult zygoteSendArgsAndGetResult(
ZygoteState zygoteState, ArrayList<String> args)
throws ZygoteStartFailedEx {
try {
// Throw early if any of the arguments are malformed. This means we can
// avoid writing a partial response to the zygote.
int sz = args.size();
for (int i = 0; i < sz; i++) {
if (args.get(i).indexOf('\n') >= 0) {
throw new ZygoteStartFailedEx("embedded newlines not allowed");
}
}

/**
* See com.android.internal.os.SystemZygoteInit.readArgumentList()
* Presently the wire format to the zygote process is:
* a) a count of arguments (argc, in essence)
* b) a number of newline-separated argument strings equal to count
*
* After the zygote process reads these it will write the pid of
* the child or -1 on failure, followed by boolean to
* indicate whether a wrapper process was used.
*/

//将应用进程的启动参数argsForZygote写入到ZygoteState中
final BufferedWriter writer = zygoteState.writer;
final DataInputStream inputStream = zygoteState.inputStream;

writer.write(Integer.toString(args.size()));
writer.newLine();

for (int i = 0; i < sz; i++) {
String arg = args.get(i);
writer.write(arg);
writer.newLine();
}

writer.flush();

//new了一个Process.ProcessStartResult对象,显然这个对象包装了进程启动的各种信息
// Should there be a timeout on this?
Process.ProcessStartResult result = new Process.ProcessStartResult();

// Always read the entire result from the input stream to avoid leaving
// bytes in the stream for future process starts to accidentally stumble
// upon.
result.pid = inputStream.readInt();
result.usingWrapper = inputStream.readBoolean();

if (result.pid < 0) {
throw new ZygoteStartFailedEx("fork() failed");
}
return result;
} catch (IOException ex) {
zygoteState.close();
throw new ZygoteStartFailedEx(ex);
}
}

因为Zygote所在进程与AMS所在进程不同,根据方法被调用时可以发现这个zygoteState是通过openZygoteSocketIfNeeded(abi)创建的,再看看这个方法:

private ZygoteState openZygoteSocketIfNeeded(String abi) throws ZygoteStartFailedEx {
Preconditions.checkState(Thread.holdsLock(mLock), "ZygoteProcess lock not held");

if (primaryZygoteState == null || primaryZygoteState.isClosed()) {
try {
//注释1
primaryZygoteState = ZygoteState.connect(mSocket);
} catch (IOException ioe) {
throw new ZygoteStartFailedEx("Error connecting to primary zygote", ioe);
}
maybeSetApiBlacklistExemptions(primaryZygoteState, false);
maybeSetHiddenApiAccessLogSampleRate(primaryZygoteState);
}
//如果与“zygote”的Socket连接返回的primaryZygoteState相匹配这直接返回该对象
if (primaryZygoteState.matches(abi)) {
return primaryZygoteState;
}

//注释2 如果不相匹配 则进行第二次
// The primary zygote didn't match. Try the secondary.
if (secondaryZygoteState == null || secondaryZygoteState.isClosed()) {
try {
secondaryZygoteState = ZygoteState.connect(mSecondarySocket);
} catch (IOException ioe) {
throw new ZygoteStartFailedEx("Error connecting to secondary zygote", ioe);
}
maybeSetApiBlacklistExemptions(secondaryZygoteState, false);
maybeSetHiddenApiAccessLogSampleRate(secondaryZygoteState);
}

if (secondaryZygoteState.matches(abi)) {
return secondaryZygoteState;
}
throw new ZygoteStartFailedEx("Unsupported zygote ABI: " + abi);
}

先看注释1处,这里调用ZygoteState的connect函数与mSocket的Socket建立连接,还记得之前在ZygoteProcess构造方法里传入的ZYGOTE_SOCKET和SECONDARY_ZYGOTE_SOCKET,它们的值分别对应的是”zygote”和”zygote_secondary”,这是因为Zygote进程启动过程时,在Zygote的main函数中会创建name为“zygote”的Server端Socket,如果连接name为“zygote”的Socket返回的primaryZygoteState与当前的abi不匹配,则会在注释2处连接name为“zygote_secondary”的Socket。这两个Socket区别就是:name为”zygote”的Socket是运行在64位Zygote进程中的,而name为“zygote_secondary”的Socket则运行在32位Zygote进程中。既然应用程序进程是通过Zygote进程fock产生的,当要连接Zygote中的Socket时,也需要保证位数的一致。

Socket进行连接成功并匹配abi后会返回ZygoteState类型对象,我们在分析zygoteSendArgsAndGetResult函数中讲过,会将应用进程的启动参数argsForZygote写入到ZygoteState中,这样Zygote进程就会收到一个创建新的应用程序进程的请求,我们回到ZygoteInit的main函数,如下所示:

public static void main(String argv[]) {
ZygoteServer zygoteServer = new ZygoteServer();

...
final Runnable caller;
try {
...
//注册Zygote用的Socket
zygoteServer.registerServerSocketFromEnv(socketName);//注释1
...
//预加载类和资源
preload(bootTimingsTraceLog);//注释2
...
if (startSystemServer) {
Runnable r = forkSystemServer(abiList, socketName, zygoteServer);

// {@code r == null} in the parent (zygote) process, and {@code r != null} in the
// child (system_server) process.
if (r != null) {
r.run();
return;
}
}
Log.i(TAG, "Accepting command socket connections");
//等待客户端请求
caller = zygoteServer.runSelectLoop(abiList);//注释4
} catch (Throwable ex) {
Log.e(TAG, "System zygote died with exception", ex);
throw ex;
} finally {
zygoteServer.closeServerSocket();
}

// We're in the child process and have exited the select loop. Proceed to execute the
// command.
if (caller != null) {
caller.run();
}
}
  • 注释1处通过registerZygoteSocket函数来创建一个Server端的Socket,这个name为”zygote”的Socket用来等待ActivityManagerService来请求Zygote来创建新的应用程序进程

  • 注释2处用来预加载类和资源。

  • 注释3处用来启动SystemServer进程,这样系统的关键服务也会由SystemServer进程启动起来。

  • 注释4处调用runSelectLoop函数来等待ActivityManagerService的请求,我们就来查看runSelectLoop:

Runnable runSelectLoop(String abiList) {
ArrayList<FileDescriptor> fds = new ArrayList<FileDescriptor>();
ArrayList<ZygoteConnection> peers = new ArrayList<ZygoteConnection>();

fds.add(mServerSocket.getFileDescriptor());
peers.add(null);

while (true) {
StructPollfd[] pollFds = new StructPollfd[fds.size()];
for (int i = 0; i < pollFds.length; ++i) {
pollFds[i] = new StructPollfd();
pollFds[i].fd = fds.get(i);
pollFds[i].events = (short) POLLIN;
}
try {
Os.poll(pollFds, -1);
} catch (ErrnoException ex) {
throw new RuntimeException("poll failed", ex);
}
for (int i = pollFds.length - 1; i >= 0; --i) {
if ((pollFds[i].revents & POLLIN) == 0) {
continue;
}

if (i == 0) {
ZygoteConnection newPeer = acceptCommandPeer(abiList);
peers.add(newPeer);
fds.add(newPeer.getFileDesciptor());
} else {
try {
ZygoteConnection connection = peers.get(i);
final Runnable command = connection.processOneCommand(this);

if (mIsForkChild) {
// We're in the child. We should always have a command to run at this
// stage if processOneCommand hasn't called "exec".
if (command == null) {
throw new IllegalStateException("command == null");
}

return command;
} else {
// We're in the server - we should never have any commands to run.
if (command != null) {
throw new IllegalStateException("command != null");
}

// We don't know whether the remote side of the socket was closed or
// not until we attempt to read from it from processOneCommand.
// This shows up as
// a regular POLLIN event in our regular processing loop.
if (connection.isClosedByPeer()) {
connection.closeSocket();
peers.remove(i);
fds.remove(i);
}
}
} catch (Exception e) {
if (!mIsForkChild) {
// We're in the server so any exception here is one that has taken place
// pre-fork while processing commands or reading / writing from the
// control socket. Make a loud noise about any such exceptions so that
// we know exactly what failed and why.

Slog.e(TAG, "Exception executing zygote command: ", e);

// Make sure the socket is closed so that the other end knows immediately
// that something has gone wrong and doesn't time out waiting for a
// response.
ZygoteConnection conn = peers.remove(i);
conn.closeSocket();

fds.remove(i);
} else {
// We're in the child so any exception caught here has happened post
// fork and before we execute ActivityThread.main (or any other main()
// method). Log the details of the exception and bring down the process.
Log.e(TAG, "Caught post-fork exception in child process.", e);
throw e;
}
} finally {
// Reset the child flag, in the event that the child process is a child-
// zygote. The flag will not be consulted this loop pass after the Runnable
// is returned.
mIsForkChild = false;
}
}
}
}
}

这里要返回的Runnable对象又到了ZygoteConnection的processOneCommand方法里:

Runnable processOneCommand(ZygoteServer zygoteServer) {
String args[];
Arguments parsedArgs = null;
FileDescriptor[] descriptors;
···
int pid = -1;
FileDescriptor childPipeFd = null;
FileDescriptor serverPipeFd = null;

parsedArgs = new Arguments(args);

···
applyUidSecurityPolicy(parsedArgs, peer);
applyInvokeWithSecurityPolicy(parsedArgs, peer);

applyDebuggerSystemProperty(parsedArgs);
applyInvokeWithSystemProperty(parsedArgs);
···
pid = Zygote.forkAndSpecialize(parsedArgs.uid, parsedArgs.gid, parsedArgs.gids,
parsedArgs.runtimeFlags, rlimits, parsedArgs.mountExternal, parsedArgs.seInfo,
parsedArgs.niceName, fdsToClose, fdsToIgnore, parsedArgs.startChildZygote,
parsedArgs.instructionSet, parsedArgs.appDataDir);

try {
if (pid == 0) {
// in child
zygoteServer.setForkChild();

zygoteServer.closeServerSocket();
IoUtils.closeQuietly(serverPipeFd);
serverPipeFd = null;

return handleChildProc(parsedArgs, descriptors, childPipeFd,
parsedArgs.startChildZygote);
} else {
// In the parent. A pid < 0 indicates a failure and will be handled in
// handleParentProc.
IoUtils.closeQuietly(childPipeFd);
childPipeFd = null;
handleParentProc(pid, descriptors, serverPipeFd);
return null;
}
} finally {
IoUtils.closeQuietly(childPipeFd);
IoUtils.closeQuietly(serverPipeFd);
}
}

再看handleChildProc方法:

private Runnable handleChildProc(Arguments parsedArgs, FileDescriptor[] descriptors,
FileDescriptor pipeFd, boolean isZygote) {
/**
* By the time we get here, the native code has closed the two actual Zygote
* socket connections, and substituted /dev/null in their place. The LocalSocket
* objects still need to be closed properly.
*/
···
closeSocket();

if (parsedArgs.niceName != null) {
Process.setArgV0(parsedArgs.niceName);
}

// End of the postFork event.
Trace.traceEnd(Trace.TRACE_TAG_ACTIVITY_MANAGER);
if (parsedArgs.invokeWith != null) {
WrapperInit.execApplication(parsedArgs.invokeWith,
parsedArgs.niceName, parsedArgs.targetSdkVersion,
VMRuntime.getCurrentInstructionSet(),
pipeFd, parsedArgs.remainingArgs);

// Should not get here.
throw new IllegalStateException("WrapperInit.execApplication unexpectedly returned");
} else {
//传进来的参数,上文传进来的是parsedArgs.startChildZygote
//根据命名显然是是否开始子进程的意思,所以为true
if (!isZygote) {
return ZygoteInit.zygoteInit(parsedArgs.targetSdkVersion, parsedArgs.remainingArgs,
null /* classLoader */);
} else {
return ZygoteInit.childZygoteInit(parsedArgs.targetSdkVersion,
parsedArgs.remainingArgs, null /* classLoader */);
}
}
}

再看ZygoteInit.childZygoteInit方法,这里传进去了目标SDK版本和相关参数:

static final Runnable childZygoteInit(
int targetSdkVersion, String[] argv, ClassLoader classLoader) {
RuntimeInit.Arguments args = new RuntimeInit.Arguments(argv);
return RuntimeInit.findStaticMain(args.startClass, args.startArgs, classLoader);
}

这个方法就比较简单了,直接传到了RuntimeInit.findStaticMain方法里:

protected static Runnable findStaticMain(String className, String[] argv,
ClassLoader classLoader) {
Class<?> cl;

try {
cl = Class.forName(className, true, classLoader);
} catch (ClassNotFoundException ex) {
throw new RuntimeException(
"Missing class when invoking static main " + className,
ex);
}

Method m;
try {
m = cl.getMethod("main", new Class[] { String[].class });
} catch (NoSuchMethodException ex) {
throw new RuntimeException(
"Missing static main on " + className, ex);
} catch (SecurityException ex) {
throw new RuntimeException(
"Problem getting static main on " + className, ex);
}

int modifiers = m.getModifiers();
if (! (Modifier.isStatic(modifiers) && Modifier.isPublic(modifiers))) {
throw new RuntimeException(
"Main method is not public and static on " + className);
}

/*
* This throw gets caught in ZygoteInit.main(), which responds
* by invoking the exception's run() method. This arrangement
* clears up all the stack frames that were required in setting
* up the process.
*/
return new MethodAndArgsCaller(m, argv);
}

最终这里返回了一个MethodAndArgsCaller对象,根据方法的返回值可以很容易知道这是一个Runnable对象,其实它是RuntimeInit的内部类:

static class MethodAndArgsCaller implements Runnable {
/** method to call */
private final Method mMethod;

/** argument array */
private final String[] mArgs;

public MethodAndArgsCaller(Method method, String[] args) {
mMethod = method;
mArgs = args;
}

public void run() {
try {
mMethod.invoke(null, new Object[] { mArgs });
} catch (IllegalAccessException ex) {
throw new RuntimeException(ex);
} catch (InvocationTargetException ex) {
Throwable cause = ex.getCause();
if (cause instanceof RuntimeException) {
throw (RuntimeException) cause;
} else if (cause instanceof Error) {
throw (Error) cause;
}
throw new RuntimeException(ex);
}
}
}

所以看到这里就知道上文caller就是这里的MethodAndArgsCaller对象,调用run方法执行的就是通过反射执行传进来的方法。这个方法在findStaticMain方法里知道了是main方法,那么是哪一个类呢,是ActivityThread类,这是在findStaticMain方法里通过反射找到的。

ActivityThread#main——App#onCreate

现在程序就执行到了ActivityThread.main方法了:

public static void main(String[] args) {
Trace.traceBegin(Trace.TRACE_TAG_ACTIVITY_MANAGER, "ActivityThreadMain");
···
Looper.prepareMainLooper();
···
ActivityThread thread = new ActivityThread();
thread.attach(false, startSeq);

if (sMainThreadHandler == null) {
sMainThreadHandler = thread.getHandler();
}
···
Looper.loop();

throw new RuntimeException("Main thread loop unexpectedly exited");
}

这里主要的三件事:

  • 调用Looper.prepareMainLooper 创建并赋值(这个looper的MessageQueue不能quit)静态变量 sMainLooper ,这样应用可以在任何地方拿到主线程的Looper对象
  • 创建ActivityThread实例,并调用attach,这两步很关键,首先,ActivityThread对象创建时,会创建ResourcesManager的单例对象。在thread.attach(false, startSeq)中还会创建 IActivityManager 对象即AMS,并为app绑定一个Application对象:
private void attach(boolean system, long startSeq) {
sCurrentActivityThread = this;
mSystemThread = system;
if (!system) {
...
final IActivityManager mgr = ActivityManager.getService();
try {
//这里传入的mAppThread是一个IApplicationThread对象
mgr.attachApplication(mAppThread, startSeq);
} catch (RemoteException ex) {
throw ex.rethrowFromSystemServer();
}
//添加一个GC回收的观察对象,当内存占用3/4时就会释放一些资源
// Watch for getting close to heap limit.
BinderInternal.addGcWatcher(new Runnable() {
@Override public void run() {
if (!mSomeActivitiesChanged) {
return;
}
Runtime runtime = Runtime.getRuntime();
long dalvikMax = runtime.maxMemory();
long dalvikUsed = runtime.totalMemory() - runtime.freeMemory();
if (dalvikUsed > ((3*dalvikMax)/4)) {
mSomeActivitiesChanged = false;
try {
mgr.releaseSomeActivities(mAppThread);
} catch (RemoteException e) {
throw e.rethrowFromSystemServer();
}
}
}
});
}
...
ViewRootImpl.addConfigCallback(configChangedCallback);
}

前面已经知道了这里的IActivityManager就是一个ActivityManagerService对象,看它的attachApplication方法:

 public final void attachApplication(IApplicationThread thread, long startSeq) {
synchronized (this) {
int callingPid = Binder.getCallingPid();
final int callingUid = Binder.getCallingUid();
final long origId = Binder.clearCallingIdentity();
attachApplicationLocked(thread, callingPid, callingUid, startSeq);
Binder.restoreCallingIdentity(origId);
}
}
private final boolean attachApplicationLocked(IApplicationThread thread,
int pid, int callingUid, long startSeq) {
...
// See if the top visible activity is waiting to run in this process...
if (normalMode) {
try {
if (mStackSupervisor.attachApplicationLocked(app)) {
didSomething = true;
}
} catch (Exception e) {
Slog.wtf(TAG, "Exception thrown launching activities in " + app, e);
badApp = true;
}
}
...
}

这里又跳转到了ActivityStackSupervisor的attachApplicationLocked方法:

boolean attachApplicationLocked(ProcessRecord app) throws RemoteException {
final String processName = app.processName;
boolean didSomething = false;
for (int displayNdx = mActivityDisplays.size() - 1; displayNdx >= 0; --displayNdx) {
final ActivityDisplay display = mActivityDisplays.valueAt(displayNdx);
for (int stackNdx = display.getChildCount() - 1; stackNdx >= 0; --stackNdx) {
final ActivityStack stack = display.getChildAt(stackNdx);
if (!isFocusedStack(stack)) {
continue;
}
stack.getAllRunningVisibleActivitiesLocked(mTmpActivityList);
final ActivityRecord top = stack.topRunningActivityLocked();
final int size = mTmpActivityList.size();
for (int i = 0; i < size; i++) {
final ActivityRecord activity = mTmpActivityList.get(i);
//如果前台栈顶Activity对应的进程信息,与新启动的进程相互吻合时,该进程就需要启动该Activity
if (activity.app == null && app.uid == activity.info.applicationInfo.uid
&& processName.equals(activity.processName)) {
try {
if (realStartActivityLocked(activity, app,
top == activity /* andResume */, true /* checkConfig */)) {
didSomething = true;
}
} catch (RemoteException e) {
Slog.w(TAG, "Exception in new application when starting activity "
+ top.intent.getComponent().flattenToShortString(), e);
throw e;
}
}
}
}
}
if (!didSomething) {
ensureActivitiesVisibleLocked(null, 0, !PRESERVE_WINDOWS);
}
return didSomething;
}

这里出现了一个之前提到但没有看过的方法,realStartActivityLocked方法,之前分析过程中说过如果应用进程已经启动的情况下去启动Activity所调用的方法,那么现在来看看:

final boolean realStartActivityLocked(ActivityRecord r, ProcessRecord app,
boolean andResume, boolean checkConfig) throws RemoteException {

···
final TaskRecord task = r.getTask();
final ActivityStack stack = task.getStack();
···
// Create activity launch transaction.
final ClientTransaction clientTransaction = ClientTransaction.obtain(app.thread,
r.appToken);
clientTransaction.addCallback(LaunchActivityItem.obtain(new Intent(r.intent),
System.identityHashCode(r), r.info,
// TODO: Have this take the merged configuration instead of separate global
// and override configs.
mergedConfiguration.getGlobalConfiguration(),
mergedConfiguration.getOverrideConfiguration(), r.compat,
r.launchedFromPackage, task.voiceInteractor, app.repProcState, r.icicle,
r.persistentState, results, newIntents, mService.isNextTransitionForward(),
profilerInfo));
// Set desired final state.
final ActivityLifecycleItem lifecycleItem;
if (andResume) {
lifecycleItem = ResumeActivityItem.obtain(mService.isNextTransitionForward());
} else {
lifecycleItem = PauseActivityItem.obtain();
}
clientTransaction.setLifecycleStateRequest(lifecycleItem);

// Schedule transaction.
mService.getLifecycleManager().scheduleTransaction(clientTransaction);
···
}

这里我们看到最后一行,mService.getLifecycleManager:

ClientLifecycleManager getLifecycleManager() {
return mLifecycleManager;
}

再到ClientLifecycleManager 里看scheduleTransaction方法:

 void scheduleTransaction(ClientTransaction transaction) throws RemoteException {
final IApplicationThread client = transaction.getClient();
transaction.schedule();
if (!(client instanceof Binder)) {
// If client is not an instance of Binder - it's a remote call and at this point it is
// safe to recycle the object. All objects used for local calls will be recycled after
// the transaction is executed on client in ActivityThread.
transaction.recycle();
}
}
private IApplicationThread mClient;
public void schedule() throws RemoteException {
mClient.scheduleTransaction(this);
}

那么这里的mClint是什么呢,他其实就是上面调用clientTransaction.obtain方法时传入的IApplicationThread实例,是一个ApplicationThread对象,那么现在再看scheduleTransaction方法:

private class ApplicationThread extends IApplicationThread.Stub {
......
@Override
public void scheduleTransaction(ClientTransaction transaction) throws RemoteException {
ActivityThread.this.scheduleTransaction(transaction);
}
......
}

由于继承自IApplicationThread.Stub,所以这里的Application就是一个Binder,然后在scheduleTransaction调用了ActivityThread的scheduleTransaction方法,这就又回到了app,但是由于ActivityThread并没有重写该方法,所以调用的实际上是它的父类ClientTransactionHandler的方法:

void scheduleTransaction(ClientTransaction transaction) {
transaction.preExecute(this);
// 抽象方法 具体实现由ActivityThread实现
sendMessage(ActivityThread.H.EXECUTE_TRANSACTION, transaction);
}
//ActivityThread
void sendMessage(int what, Object obj) {
sendMessage(what, obj, 0, 0, false);
}
private void sendMessage(int what, Object obj, int arg1, int arg2) {
sendMessage(what, obj, arg1, arg2, false);
}

private void sendMessage(int what, Object obj, int arg1, int arg2, boolean async) {
···
Message msg = Message.obtain();
msg.what = what;
msg.obj = obj;
msg.arg1 = arg1;
msg.arg2 = arg2;
if (async) {
msg.setAsynchronous(true);
}
//mH是H对象,也就是一个handler
mH.sendMessage(msg);
}

H继承自Handler,是ActivityThread的内部类,再看H的sendMessage方法:

public void handleMessage(Message msg){
···
switch(msg.what){
case EXECUTE_TRANSACTION:
final ClientTransaction transaction = (ClientTransaction) msg.obj;
mTransactionExecutor.execute(transaction);
if (isSystem()) {
// Client transactions inside system process are recycled on the client side
// instead of ClientLifecycleManager to avoid being cleared before this
// message is handled.
transaction.recycle();
}
// TODO(lifecycler): Recycle locally scheduled transactions.
break;
}
···
}

为节省篇幅这里只截取了源码中的EXECUTE_TRANSACTION一个消息,实际上源代码里还有很多,比如BIND_SERVICE,DISPATCH_PACKAGE_BROADCAST;可以看出四大组件的生命周期回调入口都在这里,具体就不在谈了。又看TransactionExecutor的execute方法:

public void execute(ClientTransaction transaction) {
final IBinder token = transaction.getActivityToken();
//执行Callbacks,然后改变Activity当前的生命周期状态
//显然app启动时还没有activity 则执行下一步
executeCallbacks(transaction);

executeLifecycleState(transaction);
mPendingActions.clear();
}
private void executeLifecycleState(ClientTransaction transaction) {
final ActivityLifecycleItem lifecycleItem = transaction.getLifecycleStateRequest();
if (lifecycleItem == null) {
// No lifecycle request, return early.
return;
}
log("Resolving lifecycle state: " + lifecycleItem);
// 创建ActivityClientRecord记录Activity,App进程的ActivityClientRecord和AMS中的ActivityRecord是一一对应的
//他们之间通过token关联
final IBinder token = transaction.getActivityToken();
final ActivityClientRecord r = mTransactionHandler.getActivityClient(token);

if (r == null) {
// Ignore requests for non-existent client records for now.
return;
}
// // lifecycleItem.getTargetState()返回的是ON_RESUME
// Cycle to the state right before the final requested state.
cycleToPath(r, lifecycleItem.getTargetState(), true /* excludeLastState */);

// Execute the final transition with proper parameters.
lifecycleItem.execute(mTransactionHandler, token, mPendingActions);
lifecycleItem.postExecute(mTransactionHandler, token, mPendingActions);
}

在executeLifecycleState方法里面,会调用TransactionExecutor的cycleToPath函数执行当前Activity的生命周期,第二个参数lifecycleItem.getTargetState确定了我们将要执行哪些声明周期函数,由于我们在realStartActivity函数中创建的是ResumeActivityItem对象,所以这里调用的是ResumeActivityItem的getTargetState函数:

 public int getTargetState() {
return ON_RESUME;
}

这里只是单纯的返回了ON_RESUME,ON_RESUME保存在他的父类ActivityLifecycleItem中:

public static final int UNDEFINED = -1;
public static final int PRE_ON_CREATE = 0;
public static final int ON_CREATE = 1;
public static final int ON_START = 2;
public static final int ON_RESUME = 3;
public static final int ON_PAUSE = 4;
public static final int ON_STOP = 5;
public static final int ON_DESTROY = 6;
public static final int ON_RESTART = 7;

下面我们来看TransactionExecutor的cycleToPath函数

private void cycleToPath(ActivityClientRecord r, int finish,
boolean excludeLastState) {
// 获取当前生命周期的状态
final int start = r.getLifecycleState();
log("Cycle from: " + start + " to: " + finish + " excludeLastState:" + excludeLastState);

final IntArray path = mHelper.getLifecyclePath(start, finish, excludeLastState);
performLifecycleSequence(r, path);
}

在该函数中创建了一个IntArray类型的对象path,该path确定了我们将要执行哪些生命周期函数,之后调用了performLifecycleSequence函数:

private void performLifecycleSequence(ActivityClientRecord r, IntArray path) {
final int size = path.size();
for (int i = 0, state; i < size; i++) {
state = path.get(i);
log("Transitioning to state: " + state);
switch (state) {
case ON_CREATE:
mTransactionHandler.handleLaunchActivity(r, mPendingActions,
null /* customIntent */);
break;
case ON_START:
mTransactionHandler.handleStartActivity(r, mPendingActions);
break;
case ON_RESUME:
mTransactionHandler.handleResumeActivity(r.token, false /* finalStateRequest */,
r.isForward, "LIFECYCLER_RESUME_ACTIVITY");
break;
case ON_PAUSE:
mTransactionHandler.handlePauseActivity(r.token, false /* finished */,
false /* userLeaving */, 0 /* configChanges */, mPendingActions,
"LIFECYCLER_PAUSE_ACTIVITY");
break;
case ON_STOP:
mTransactionHandler.handleStopActivity(r.token, false /* show */,
0 /* configChanges */, mPendingActions, false /* finalStateRequest */,
"LIFECYCLER_STOP_ACTIVITY");
break;
case ON_DESTROY:
mTransactionHandler.handleDestroyActivity(r.token, false /* finishing */,
0 /* configChanges */, false /* getNonConfigInstance */,
"performLifecycleSequence. cycling to:" + path.get(size - 1));
break;
case ON_RESTART:
mTransactionHandler.performRestartActivity(r.token, false /* start */);
break;
default:
throw new IllegalArgumentException("Unexpected lifecycle state: " + state);
}
}
}

performLifecycleSequence会根据path执行Activity相应的生命周期函数。整个流程还是比较简单的,由于是Android9新增的机制,所以得着重看一看。由于是app的启动所以activity还没有创建,所以ActivityThread的handleLaunchActivity会最先被调用:

public Activity handleLaunchActivity(ActivityClientRecord r,
PendingTransactionActions pendingActions, Intent customIntent) {
// If we are getting ready to gc after going to the background, well
// we are back active so skip it.
unscheduleGcIdler();
mSomeActivitiesChanged = true;
// 性能相关
if (r.profilerInfo != null) {
mProfiler.setProfiler(r.profilerInfo);
mProfiler.startProfiling();
}

// Make sure we are running with the most recent config.
handleConfigurationChanged(null, null);

if (localLOGV) Slog.v(
TAG, "Handling launch of " + r);

// Initialize before creating the activity
if (!ThreadedRenderer.sRendererDisabled) {
GraphicsEnvironment.earlyInitEGL();
}
// initialize函数主要是在WindowManagerGlobal中获取WindowManagerService的代理
WindowManagerGlobal.initialize();

final Activity a = performLaunchActivity(r, customIntent);

// Configuration相关
if (a != null) {
r.createdConfig = new Configuration(mConfiguration);
reportSizeConfigurations(r);
if (!r.activity.mFinished && pendingActions != null) {
pendingActions.setOldState(r.state);
pendingActions.setRestoreInstanceState(true);
pendingActions.setCallOnPostCreate(true);
}
} else {
// If there was an error, for any reason, tell the activity manager to stop us.
try {
ActivityManager.getService()
.finishActivity(r.token, Activity.RESULT_CANCELED, null,
Activity.DONT_FINISH_TASK_WITH_ACTIVITY);
} catch (RemoteException ex) {
throw ex.rethrowFromSystemServer();
}
}

return a;
}

handleLaunchActivity函数会调用performLaunchActivity返回一个Activity对象,接下来我们看performLaunchActivity函数:

private Activity performLaunchActivity(ActivityClientRecord r, Intent customIntent) {
// 获取ActivityInfo
ActivityInfo aInfo = r.activityInfo;
if (r.packageInfo == null) {
r.packageInfo = getPackageInfo(aInfo.applicationInfo, r.compatInfo,
Context.CONTEXT_INCLUDE_CODE);
}

ComponentName component = r.intent.getComponent();
if (component == null) {
component = r.intent.resolveActivity(
mInitialApplication.getPackageManager());
r.intent.setComponent(component);
}

if (r.activityInfo.targetActivity != null) {
component = new ComponentName(r.activityInfo.packageName,
r.activityInfo.targetActivity);
}

// 创建ContextImpl
ContextImpl appContext = createBaseContextForActivity(r);

// 利用反射创建Activity
Activity activity = null;
try {
java.lang.ClassLoader cl = appContext.getClassLoader();
activity = mInstrumentation.newActivity(
cl, component.getClassName(), r.intent);
StrictMode.incrementExpectedActivityCount(activity.getClass());
r.intent.setExtrasClassLoader(cl);
r.intent.prepareToEnterProcess();
if (r.state != null) {
r.state.setClassLoader(cl);
}
} catch (Exception e) {
if (!mInstrumentation.onException(activity, e)) {
throw new RuntimeException(
"Unable to instantiate activity " + component
+ ": " + e.toString(), e);
}
}

// 由于在handleBindApplication函数中已经创建了Application,所以在LoadedApk类内mApplication不为空,此处直接返回handleBindApplication函数创建的Application对象
try {
Application app = r.packageInfo.makeApplication(false, mInstrumentation);

if (localLOGV) Slog.v(TAG, "Performing launch of " + r);
if (localLOGV) Slog.v(
TAG, r + ": app=" + app
+ ", appName=" + app.getPackageName()
+ ", pkg=" + r.packageInfo.getPackageName()
+ ", comp=" + r.intent.getComponent().toShortString()
+ ", dir=" + r.packageInfo.getAppDir());

if (activity != null) {
CharSequence title = r.activityInfo.loadLabel(appContext.getPackageManager());
Configuration config = new Configuration(mCompatConfiguration);
if (r.overrideConfig != null) {
config.updateFrom(r.overrideConfig);
}
if (DEBUG_CONFIGURATION) Slog.v(TAG, "Launching activity "
+ r.activityInfo.name + " with config " + config);
Window window = null;
if (r.mPendingRemoveWindow != null && r.mPreserveWindow) {
window = r.mPendingRemoveWindow;
r.mPendingRemoveWindow = null;
r.mPendingRemoveWindowManager = null;
}

appContext.setOuterContext(activity);
// 调用activity的attach方法
activity.attach(appContext, this, getInstrumentation(), r.token,
r.ident, app, r.intent, r.activityInfo, title, r.parent,
r.embeddedID, r.lastNonConfigurationInstances, config,
r.referrer, r.voiceInteractor, window, r.configCallback);

if (customIntent != null) {
activity.mIntent = customIntent;
}
r.lastNonConfigurationInstances = null;
checkAndBlockForNetworkAccess();
activity.mStartedActivity = false;
int theme = r.activityInfo.getThemeResource();
if (theme != 0) {
activity.setTheme(theme);
}

activity.mCalled = false;
// 调用activity的OnCreate
if (r.isPersistable()) {
mInstrumentation.callActivityOnCreate(activity, r.state, r.persistentState);
} else {
mInstrumentation.callActivityOnCreate(activity, r.state);
}
if (!activity.mCalled) {
throw new SuperNotCalledException(
"Activity " + r.intent.getComponent().toShortString() +
" did not call through to super.onCreate()");
}
r.activity = activity;
}
r.setState(ON_CREATE);

mActivities.put(r.token, r);

} catch (SuperNotCalledException e) {
throw e;

} catch (Exception e) {
if (!mInstrumentation.onException(activity, e)) {
throw new RuntimeException(
"Unable to start activity " + component
+ ": " + e.toString(), e);
}
}

return activity;
}

函数performLaunchActivity首先利用反射机制创建了Activity对象,然后调用Activity的attach函数初始化新建的Activity,最后调用activity的onCreat函数。我们先看一下Activity.attach函数内部都做了什么。

final void attach(Context context, ActivityThread aThread,
Instrumentation instr, IBinder token, int ident,
Application application, Intent intent, ActivityInfo info,
CharSequence title, Activity parent, String id,
NonConfigurationInstances lastNonConfigurationInstances,
Configuration config, String referrer, IVoiceInteractor voiceInteractor,
Window window, ActivityConfigCallback activityConfigCallback) {
attachBaseContext(context);

mFragments.attachHost(null /*parent*/);

mWindow = new PhoneWindow(this, window, activityConfigCallback);
...

mWindow.setWindowManager(
(WindowManager)context.getSystemService(Context.WINDOW_SERVICE),
mToken, mComponent.flattenToString(),
(info.flags & ActivityInfo.FLAG_HARDWARE_ACCELERATED) != 0);
if (mParent != null) {
mWindow.setContainer(mParent.getWindow());
}
mWindowManager = mWindow.getWindowManager();
....
}

Activity的attach函数内部初始化Activity的成员变量,创建了PhoneWindow对象并为PhoneWindow和Activity创建了WindowManagerImpl对象,getWindow函数返回了Activity类中的mWindow对象,在Activity.attach函数中创建了PhoneWindow对象并保存为mWindow。关于attach方法的细节留到后面再谈,现在继续看mInstrumentation.callActivityOnCreate方法:

public void callActivityOnCreate(Activity activity, Bundle icicle) {
prePerformCreate(activity);
activity.performCreate(icicle);
postPerformCreate(activity);
}

/**
* Perform calling of an activity's {@link Activity#onCreate}
* method. The default implementation simply calls through to that method.
* @param activity The activity being created.
* @param icicle The previously frozen state (or null) to pass through to
* @param persistentState The previously persisted state (or null)
*/
public void callActivityOnCreate(Activity activity, Bundle icicle,
PersistableBundle persistentState) {
prePerformCreate(activity);
activity.performCreate(icicle, persistentState);
postPerformCreate(activity);
}

最终activity的创建来到了它的performCreate方法:

final void performCreate(Bundle icicle) {
performCreate(icicle, null);
}

final void performCreate(Bundle icicle, PersistableBundle persistentState) {
mCanEnterPictureInPicture = true;
restoreHasCurrentPermissionRequest(icicle);
//熟悉的onCreate方法出现了,整个流程也走完了
if (persistentState != null) {
onCreate(icicle, persistentState);
} else {
onCreate(icicle);
}
writeEventLog(LOG_AM_ON_CREATE_CALLED, "performCreate");
mActivityTransitionState.readState(icicle);

mVisibleFromClient = !mWindow.getWindowStyle().getBoolean(
com.android.internal.R.styleable.Window_windowNoDisplay, false);
mFragments.dispatchActivityCreated();
mActivityTransitionState.setEnterActivityOptions(this, getActivityOptions());
}

随着那熟悉的onCreate方法的出现,整个启动流程就

记一道面试题

我在头条一面的时候,面试官问完activity的生命周期后,又问道我刚才回答的这些方法比如onCreate,他是由谁调用的呢?

当然这些方法是activity自身的方法,也没有严格的说能由谁调用,但是既然面试官要问,就一定有他的道理,这里我们也已经看完了这个启动流程,那么你觉得是由谁调用的呢。当时我并没有答上来,而是答了是由LifecycleOwner调用,在那里回调的。面试结束之后,我又才恍然大悟,其实就是由Instrumentation这个类的callActivityOnCreate方法调用的。就这么一个小问题就会反映出很多问题,面试不会直白的问源码中怎么实现,而是会进行一些变种,所以在看源码的过程中应该理清楚各个流程做了些什么,多思考多提问,而不是记住甚至是背下流程。

全文总结

不得不说整个流程还是比较复杂的,但在用户使用的时候就是点击一下然后app就启动到眼前一瞬间的事。拉完整个流程对笔者的帮助真的很大,不仅收获了很多源码阅读的经验,还能了解系统的工作原理。随着反复看的次数增加,笔者也逐渐能够对启动流程有个一知半解,也慢慢开始理解和体会到它的意义与设计上的巧妙。最后向大家推荐一本书《Android进阶解密》,对阅读FramWork层源码比较有帮助,也比较系统。

一张大图来总结一下吧

Author: zhf
Link: http://yoursite.com/2019/08/02/浅谈App启动流程/
Copyright Notice: All articles in this blog are licensed under CC BY-NC-SA 4.0 unless stating additionally.
Donate
  • 微信
  • 支付寶