浅谈Handler内部原理

首先分别介绍一些 handler,message,Looper,MessageQueue
handler用于同一个进程的线程间通信。Looper让主线程无限循环地从自己的MessageQueue拿出消息处理,既然这样我们就知道处理消息肯定是在主线程中处理的,那么怎样在其他的线程往主线程的队列里放入消息呢?其实很简单,我们知道在同一进程中线程和线程之间资源是共享的,也就是对于任何变量在任何线程都是可以访问和修改的,只要考虑并发性做好同步就行了,那么只要拿到MessageQueue 的实例,就可以往主线程的MessageQueue放入消息,主线程在轮询的时候就会在主线程**处理这个消息。那么怎么拿到主线程 MessageQueue的实例,是可以拿到的(在主线程下mLooper = Looper.myLooper();mQueue = mLooper.mQueue;),但是Google为了统一添加消息和消息的回调处理,又专门构建了Handler类,你只要在主线程构建Handler类,那么这个Handler实例就获取主线程MessageQueue实例的引用(获取方式mLooper = Looper.myLooper();mQueue = mLooper.mQueue;),Handler 在sendMessage的时候就通过这个引用往消息队列里插入新消息。Handler 的另外一个作用,就是能统一处理消息的回调。这样一个Handler发出消息又确保消息处理也是自己来做,这样的设计非常的赞。具体做法就是在队列里面的Message持有Handler的引用(哪个handler 把它放到队列里,message就持有了这个handler的引用),然后等到主线程轮询到这个message的时候,就来回调我们经常重写的Handler的handleMessage(Message msg)方法。源码分析:

public Handler() {
this(null, false);
}
public Handler(Callback callback, boolean async) {
//不是static 发出可能内存泄露的警告!
if (FIND_POTENTIAL_LEAKS) {
final Class<? extends Handler> klass = getClass();
if ((klass.isAnonymousClass() || klass.isMemberClass() || klass.isLocalClass()) &&
(klass.getModifiers() & Modifier.STATIC) == 0) {
Log.w(TAG, "The following Handler class should be static or leaks might occur: " +
klass.getCanonicalName());
}
}
//获取当前线程的Looper,还记得前面讲过 Looper.myLooper()方法了吗?
//Looper.myLooper()内部实现可以先简单理解成:map.get(Thread.currentThread())
//获取当前线程的Looper
mLooper = Looper.myLooper();
if (mLooper == null) {
//当前线程不是Looper 线程,没有调用Looper.prepare()给线程创建Looper对象
throw new RuntimeException(
"Can't create handler inside thread that has not called Looper.prepare()");
}
//让Handler 持有当前线程消息队列的引用
mQueue = mLooper.mQueue;
//这些callback先不管,主要用于handler的消息发送的回调,优先级是比handlerMessage高,但是不常用
mCallback = callback;
mAsynchronous = async;
}

上面的代码说明了下面几个问题:
1、Handler 对象在哪个线程下构建(Handler的构造函数在哪个线程下调用),那么Handler 就会持有这个线程的Looper引用和这个线程的消息队列的引用。因为持有这个线程的消息队列的引用,意味着这个Handler对象可以在任意其他线程给该线程的消息队列添加消息,也意味着Handler的handlerMessage 肯定也是在该线程执行的。
2、如果该线程不是Looper线程,在这个线程new Handler 就会报错!
3、上面两点综合说明了下面一段很常见的代码:把普通线程转成Looper线程的代码,为什么在Looper.prepare()和Looper.loop()中间要创建Handler:

class LooperThread extends Thread {
//其他线程可以通过mHandler这个引用给该线程的消息队列添加消息
public Handler mHandler;
public void run() {
Looper.prepare();
//需要在线程进入死循环之前,创建一个Handler实例供外界线程给自己发消息
mHandler = new Handler() {
public void handleMessage(Message msg) {
//Handler 对象在这个线程构建,那么handleMessage的方法就在这个线程执行
}
};
Looper.loop();
}
}

那么接下来,我们接着往下看Handler的sendMessage(msg)方法,这个方法也是比较重要的,也比较常用,Handler 有很多sendXXXX开头的方法sendMessageAtTime、sendEmptyMessageDelayed、sendEmptyMessage等等,都是用来给消息队列添加消息的,那么这些方法最终都会调用enqueueMessage来实现消息进入队列:

private boolean enqueueMessage(MessageQueue queue, Message msg, long uptimeMillis) {
//这句话很重要,让消息持有当前Handler的引用,在消息被Looper线程轮询到的时候
//回调handler的handleMessage方法
msg.target = this;
if (mAsynchronous) {
msg.setAsynchronous(true);
}
//调用MessageQueue 的enqueueMessage 方法把消息放入队列
return queue.MessageQueue(msg, uptimeMillis);
}

我们再来看下MessageQueue 的enqueueMessage(msg, uptimeMillis)方法:

boolean enqueueMessage(Message msg, long when) {
// msg 必须有target也就是必须有handler
if (msg.target == null) {
throw new IllegalArgumentException("Message must have a target.");
}
if (msg.isInUse()) {
throw new IllegalStateException(msg + " This message is already in use.");
}
//插入消息队列的时候需要做同步,因为会有多个线程同时做往这个队列插入消息
synchronized (this) {
if (mQuitting) {
IllegalStateException e = new IllegalStateException(
msg.target + " sending message to a Handler on a dead thread");
Log.w(TAG, e.getMessage(), e);
msg.recycle();
return false;
}

msg.markInUse();
//when 表示这个消息执行的时间,队列是按照消息执行时间排序的
//如果handler 调用的是postDelay 那么when=SystemClock.uptimeMillis()+delayMillis
msg.when = when;
Message p = mMessages;
boolean needWake;
if (p == null || when == 0 || when < p.when) {
// p==null 表示当前消息队列没有消息
msg.next = p;
mMessages = msg;
//需要唤醒主线程,如果队列没有元素,主线程会堵塞在管道的读端,这时
//候队列突然有消息了,就会往管道写入字符,唤醒主线程
needWake = mBlocked;
} else {
// Inserted within the middle of the queue. Usually we don't have to wake
// up the event queue unless there is a barrier at the head of the queue
// and the message is the earliest asynchronous message in the queue.
needWake = mBlocked && p.target == null && msg.isAsynchronous();
Message prev;
//将消息放到队列的确切位置,队列是按照msg的when 排序的,链表操作自己看咯
for (;;) {
prev = p;
p = p.next;
if (p == null || when < p.when) {
break;
}
if (needWake && p.isAsynchronous()) {
needWake = false;
}
}
msg.next = p; // invariant: p == prev.next
prev.next = msg;
}

// 如果需要唤醒Looper线程,这里调用native的方法实现epoll机制唤醒线程,我们就不在深入探讨了
if (needWake) {
nativeWake(mPtr);
}
}
return true;
}

最后我们再看下Handler 的dispatchMessage方法,这个方法在Looper线程从消息队列拿出来的时候,通过msg.target.dispatchMessage(msg)调用的。

/**
* Handle system messages here.
*/
public void dispatchMessage(Message msg) {
//优先调用callback方法
if (msg.callback != null) {
handleCallback(msg);
} else {
if (mCallback != null) {
if (mCallback.handleMessage(msg)) {
return;
}
}
//最后会回调我们重写的handleMessage 方法
handleMessage(msg);
}
}

Message 是Handler发送的消息内容。

//获取Message实例的方式
Message msg1 = Message.obtain();
//或
Message msg2 = Handler.obtainMessage();

MessgeQueue 存放Message的消息的单链表的数据结构来存储消息,获取MessageQueue实例使用Looper.myQueue()方法

Looper 是一个轮询器负责,负责轮询MessageQueue里面的消息,然后将looper轮询的消息发送到Handler里面,一个Handler是对应一个Looper.Looper主要用于给一个线程轮询消息的。线程默认没有Looper,在创建Handler对象前,我们需要为线程创建Looper。使用Looper.prepare()方法创建Looper,使用Looper.loop()方法运行消息队列。我们知道一个线程是一段可执行的代码,当可执行代码执行完成后,线程生命周期便会终止,线程就会退出,那么做为App的主线程,如果代码段执行完了会怎样?,那么就会出现App启动后执行一段代码后就自动退出了,这是很不合理的。所以为了防止代码段被执行完,只能在代码中插入一个死循环,那么代码就不会被执行完,然后自动退出,怎么在在代码中插入一个死循环呢?那么Looper出现了,在主线程中调用Looper.prepare()…Looper.loop()就会变当前线程变成Looper线程(可以先简单理解:无限循环不退出的线程),Looper.loop()方法里面有一段死循环的代码,所以主线程会进入while(true){…}的代码段跳不出来,但是主线程也不能什么都不做吧?其实所有做的事情都在while(true){…}里面做了,主线程会在死循环中不断等其他线程给它发消息(消息包括:Activity启动,生命周期,更新UI,控件事件等),一有消息就根据消息做相应的处理,Looper的另外一部分工作就是在循环代码中会不断从消息队列挨个拿出消息给主线程处理。
Looper在创建完成后就开始了一个无限for循环,不断的从MessageQueue中取Message。

public final class Looper {
// sThreadLocal 是static的变量,可以先简单理解它相当于map,key是线程,value是Looper,
//那么你只要用当前的线程就能通过sThreadLocal获取当前线程所属的Looper。
static final ThreadLocal<Looper> sThreadLocal = new ThreadLocal<Looper>();
//主线程(UI线程)的Looper 单独处理,是static类型的,通过下面的方法getMainLooper()
//可以方便的获取主线程的Looper。
private static Looper sMainLooper;

//Looper 所属的线程的消息队列
final MessageQueue mQueue;
//Looper 所属的线程
final Thread mThread;

public static void prepare() {
prepare(true);
}

private static void prepare(boolean quitAllowed) {
//如果线程的TLS已有数据,则会抛出异常,一个线程只能有一个Looper,prepare不能重复调用。
if (sThreadLocal.get() != null) {
throw new RuntimeException("Only one Looper may be created per thread");
}
//往线程的TLS插入数据,简单理解相当于map.put(Thread.currentThread(),new Looper(quitAllowed));
sThreadLocal.set(new Looper(quitAllowed));
}

//实际上是调用 prepare(false),并然后给sMainLooper赋值。
public static void prepareMainLooper() {
prepare(false);
synchronized (Looper.class) {
if (sMainLooper != null) {
throw new IllegalStateException("The main Looper has already been prepared.");
}
sMainLooper = myLooper();
}
}
//static 方法,方便获取主线程的Looper.
public static Looper getMainLooper() {
synchronized (Looper.class) {
return sMainLooper;
}
}

public static @Nullable Looper myLooper() {
//具体看ThreadLocal类的源码的get方法,
//简单理解相当于map.get(Thread.currentThread()) 获取当前线程的Looper
return sThreadLocal.get();
}
}

看了上面的代码(仔细看下注释),我们发现 Looper.prepareMainLooper()做的事件就是new了一个Looper实例并放入Looper类下面一个static的ThreadLocal sThreadLocal静态变量中,同时给sMainLooper赋值,给sMainLooper赋值是为了方便通过Looper.getMainLooper()快速获取主线程的Looper,sMainLooper是主线程的Looper可能获取会比较频繁,避免每次都到 sThreadLocal 去查找获取。

接下来重点是看下Looper的构造函数,看看在new Looper的时候做了什么事?

private Looper(boolean quitAllowed) {
mQueue = new MessageQueue(quitAllowed);
mThread = Thread.currentThread();
}

当前线程创建了消息队列MessageQueue,并且让Looper持有MessageQueue的引用。执行完Looper.prepareMainLooper() 之后,主线程从普通线程转成一个Looper线程。目前的主线程线程已经有一个Looper对象和一个消息队列mQueue,引用关系如下图:(主线程可以轻松获取它的Looper,主线程的Looper持有主线程消息队列的引用)

具体如何获取主线程的Looper对象和消息列表呢?

//在主线程中执行
mLooper = Looper.myLooper();
mQueue = mLooper.mQueue
//或者
mLooper=Looper.getMainLooper()

主线程:Main Thread,又叫UI线程(UI Thread)。Android应用执行的线程,所以叫主线程。负责分发事件到合适的UI窗口,也是应用和Android UI套件交互的线程。所以叫UI线程。
ANR:应用无响应(application not responding)。如果UI线程阻塞超过几秒(现在一般是5秒),用户就会看到应用无响应的Dialog。
Android的消息处理机制,首先在ActivityThread类有我们熟悉的main的函数,App启动的代码的入口就在这里,UI线程本来只是一个普通线程,在这里会把UI线程转换成Looper线程,什么是Looper线程,不急往下看就知道了。

public final class ActivityThread {
public static final void main(String[] args) {
......
Looper.prepareMainLooper();
......
ActivityThread thread = new ActivityThread();
thread.attach(false);

if (sMainThreadHandler == null) {
sMainThreadHandler = thread.getHandler();
}
......
Looper.loop();
......
}
}

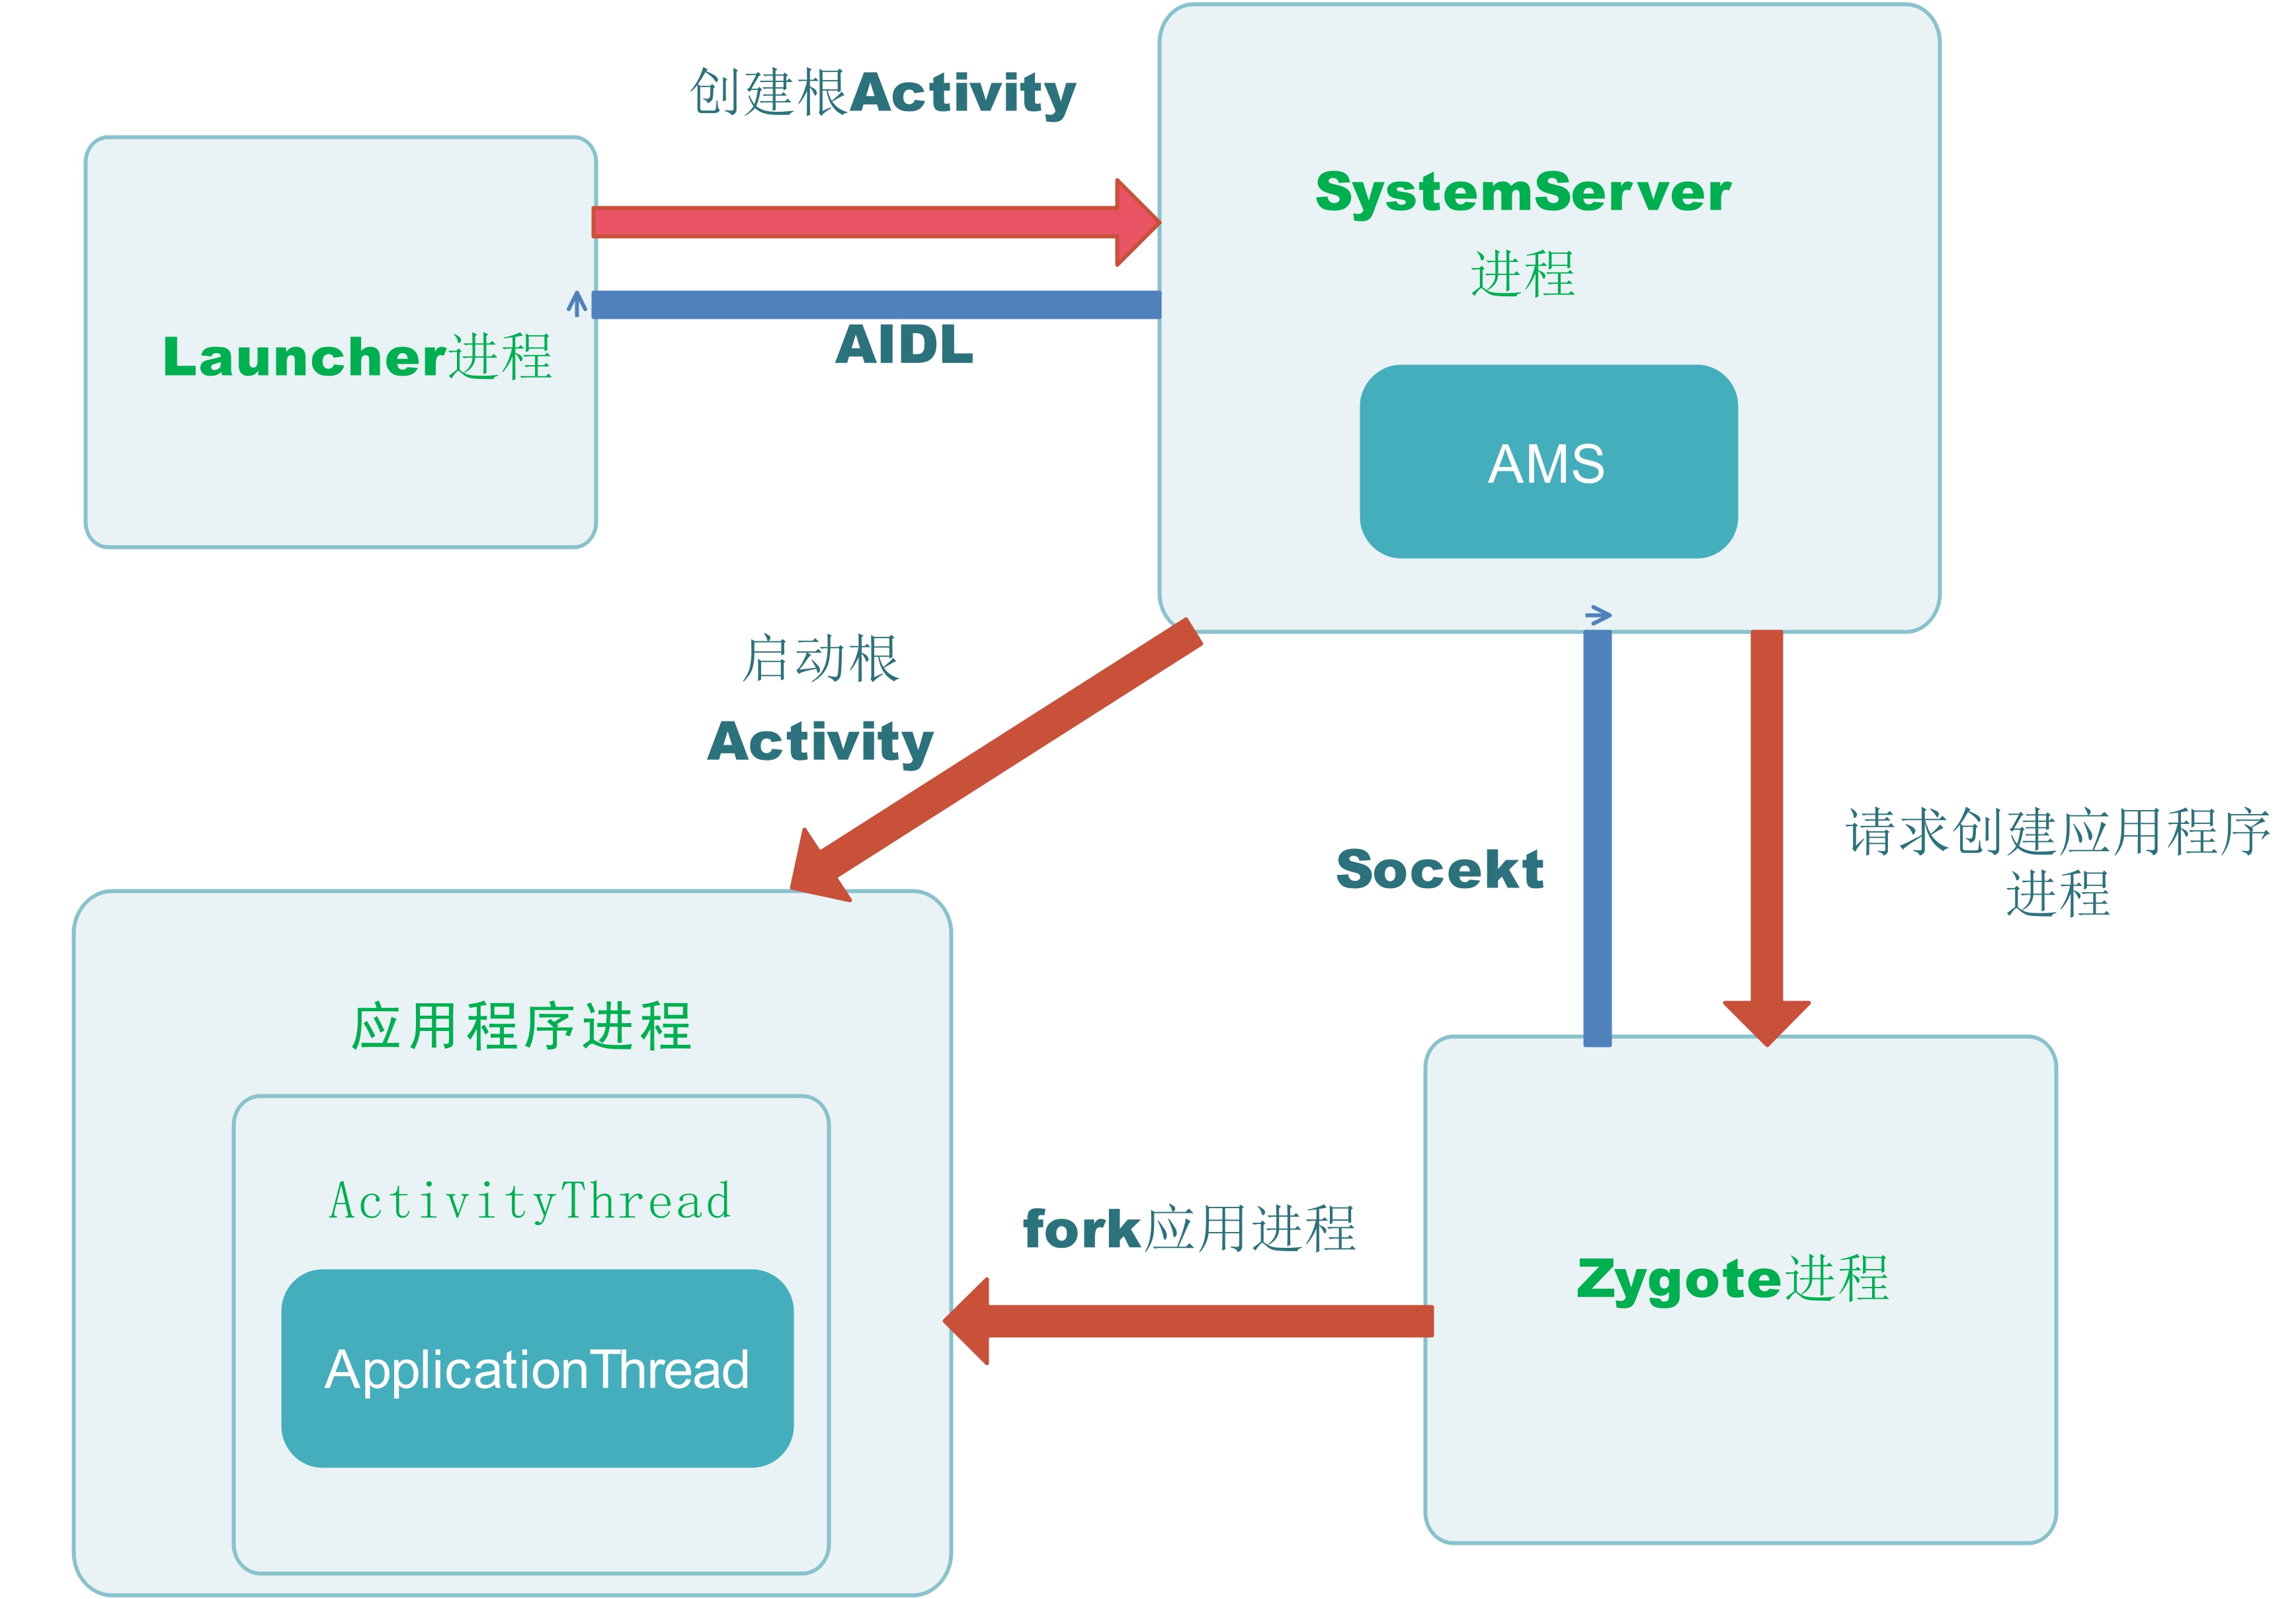
这里首先执行的是Looper.prepareMainLooper()方法,执行完Looper.prepareMainLooper() 之后下一句代码是ActivityThread thread = new ActivityThread();这句话就是创建一下ActivityThread对象,这边需要注意的时候ActivityThread并不是一个线程,它并没有继承Thread,而只是一个普通的类public final class ActivityThread{…}ActivityThread的构造函数并没有做什么事只是初始化了资源管理器。

ActivityThread() {
mResourcesManager = ResourcesManager.getInstance();
}

接着往下看下一行代码

ActivityThread thread = new ActivityThread();
//建立Binder通道 (创建新线程)
thread.attach(false);

thread.attach(false);便会创建一个Binder线程(具体是指ApplicationThread,该Binder线程会通过想 Handler将Message发送给主线程,之后讲)。我们之前提到主线程最后会进入无限循环当中,如果没有在进入死循环之前创建其他线程,那么待会谁会给主线程发消息呢?,没错就是在这里创建了这个线程,这个线程会接收来自系统服务发送来的一些事件封装了Message并发送给主线程,主线程在无限循环中从队列里拿到这些消息并处理这些消息。(Binder线程发生的消息包括LAUNCH_ACTIVITY,PAUSE_ACTIVITY 等等)

继续回到mian 函数的下一句代码Looper.loop() 那么重点来了,我们来看下Looper.loop()的源码:

public static void loop() {
final Looper me = myLooper(); //获取TLS存储的Looper对象,获取当前线程的Looper
if (me == null) {
throw new RuntimeException("No Looper; Looper.prepare() wasn't called on this thread.");
}

final MessageQueue queue = me.mQueue; //获取Looper对象中的消息队列
....

for (;;) { //主线程开启无限循环模式
Message msg = queue.next(); //获取队列中的下一条消息,可能会线程阻塞
if (msg == null) { //没有消息,则退出循环,退出消息循环,那么你的程序也就可以退出了
return;
}
....
//分发Message,msg.target 是一个Handler对象,哪个Handler把这个Message发到队列里,
//这个Message会持有这个Handler的引用,并放到自己的target变量中,这样就可以回调我们重写
//的handler的handleMessage方法。
msg.target.dispatchMessage(msg);
....
....
msg.recycleUnchecked(); //将Message回收到消息池,下次要用的时候不需要重新创建,obtain()就可以了。
}
}

这时候主线程(UI线程)执行到这一步就进入了死循环,不断地去拿消息队列里面的消息出来处理.上面代码的重点是queue.next() 的函数,我们来看下queue.next()的源码:


Message next()

final long ptr = mPtr;
if (ptr == 0) {
return null;
}
int pendingIdleHandlerCount = -1; // -1 only during first iteration

//nextPollTimeoutMillis 表示nativePollOnce方法需要等待nextPollTimeoutMillis
//才会返回
int nextPollTimeoutMillis = 0;
for (;;) {
if (nextPollTimeoutMillis != 0) {
Binder.flushPendingCommands();
}
//读取消息,队里里没有消息有可能会堵塞,两种情况该方法才会返回(代码才能往下执行)
//一种是等到有消息产生就会返回,
//另一种是当等了nextPollTimeoutMillis时长后,nativePollOnce也会返回
nativePollOnce(ptr, nextPollTimeoutMillis);
//nativePollOnce 返回之后才能往下执行
synchronized (this) {
// Try to retrieve the next message. Return if found.
final long now = SystemClock.uptimeMillis();
Message prevMsg = null;
Message msg = mMessages;
if (msg != null && msg.target == null) {
// 循环找到一条不是异步而且msg.target不为空的message
do {
prevMsg = msg;
msg = msg.next;
} while (msg != null && !msg.isAsynchronous());
}
if (msg != null) {
if (now < msg.when) {
// 虽然有消息,但是还没有到运行的时候,像我们经常用的postDelay,
//计算出离执行时间还有多久赋值给nextPollTimeoutMillis,
//表示nativePollOnce方法要等待nextPollTimeoutMillis时长后返回
nextPollTimeoutMillis = (int) Math.min(msg.when - now, Integer.MAX_VALUE);
} else {
// 获取到消息
mBlocked = false;
//链表一些操作,获取msg并且删除该节点
if (prevMsg != null)
prevMsg.next = msg.next;
} else {
mMessages = msg.next;
}
msg.next = null
msg.markInUse();
//返回拿到的消息
return msg;
}
} else {
//没有消息,nextPollTimeoutMillis复位
nextPollTimeoutMillis = -1;
}
.....
.....

}

到这里,从应用启动创建Looper,创建消息队列,到进入loop方法执行无限循环中,那么这一块就告一段落了,主线程已经在死循环里轮询等待消息了,接下来在子线程中通过Handler向发送Message,Handler先把这些消息放到消息队列中。然后Looper通过DisopatchMessage分发消息,分发的目标就是Handler。然后Hander调用回调函数(如果设置callback的话),如果没有就调用子类的中的handleMessage来处理和更新UI.

Author: zhf
Link: http://yoursite.com/2019/07/30/浅谈Handler内部原理/
Copyright Notice: All articles in this blog are licensed under CC BY-NC-SA 4.0 unless stating additionally.
Donate
  • 微信
  • 支付寶